Imagine stepping out of a warm shower and enveloping your skin in a cloud-like cream that melts instantly, leaving you feeling soft, hydrated, and pampered. Creating your own DIY whipped body butter is one of the most rewarding projects for any home formulator. Unlike store-bought lotions that often rely on water and synthetic thickeners, a homemade whipped butter is a concentrated powerhouse of plant-based nutrients. This luxurious moisturiser provides a rich, natural alternative to commercial products, allowing you to control every single ingredient that touches your skin. Whether you are a beginner looking for your first successful project or an intermediate crafter refining your technique, this guide will show you how to achieve that perfect, airy texture every time.
The beauty of a DIY whipped body butter lies in its simplicity and its efficacy. In the world of natural beauty, few products can match the deep, penetrative moisture of a waterless butter. While commercial lotions often contain up to 70% water, which evaporates quickly, a whipped butter is 100% active ingredients. This means every gram you apply is working to repair your skin’s lipid barrier, soothe dryness, and provide a protective shield against environmental stressors. In this comprehensive guide, we will delve into the science of butters, the art of the perfect whip, and the safety protocols you need to follow to create a professional-grade product in your own kitchen.
Why Choose DIY Whipped Body Butter Over Regular Lotion?
When you first start exploring natural skincare, the difference between a lotion and a body butter can be confusing. Traditional lotions are typically emulsions, which means they are a blend of water and oil held together by an emulsifying wax. Because they contain water, lotions require a broad-spectrum preservative to prevent the growth of mould and bacteria. They are excellent for quick hydration but often evaporate quickly from the skin surface. They are designed for daily use on normal skin types where a light, non-greasy feel is the primary goal.
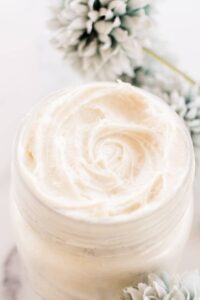
In contrast, a DIY whipped body butter is an anhydrous (water-free) formulation. It is composed entirely of natural butters and carrier oils. This makes it significantly more concentrated and nourishing than lotion. Because there is no water, the ingredients sit on the skin longer, creating a protective barrier that locks in moisture. This is particularly beneficial for those with very dry skin, eczema, or rough patches on elbows and knees. By whipping the mixture, we incorporate air to create a light, mousse-like consistency that is much easier to spread than a solid balm. It offers the richness of a heavy cream with the delightful application of a soufflé. Furthermore, because it is waterless, it has a naturally long shelf life without the need for synthetic preservatives, making it a favourite for those seeking a truly “clean” beauty routine.
| Feature | Regular Body Lotion | DIY Whipped Body Butter |
|---|---|---|
| Composition | Water, Oil, Emulsifiers | Pure Butters and Oils |
| Texture | Liquid, Thin, Pourable | Thick, Fluffy, Airy, Mousse-like |
| Preservatives | Required (contains water) | Not required (water-free) |
| Hydration | Surface-level, fast-absorbing | Deep, long-lasting moisture barrier |
| Ideal For | Normal skin, daily light use | Dry skin, winter care, rough patches |
Key Ingredients for the Perfect Whipped Texture
The secret to a successful DIY whipped body butter lies in the balance between hard butters and liquid oils. If you use too much hard butter, the result will be grainy or too firm to whip. If you use too much liquid oil, the “whip” will collapse into an oily puddle. For a balanced, professional-grade result, we recommend a combination of the following star ingredients. Each one brings a specific fatty acid profile and therapeutic benefit to the final blend.
Shea Butter and Mango Butter
Shea butter is the gold standard for body butters. Harvested from the nuts of the karite tree, it is incredibly rich in vitamins A, E, and F, which help to restore skin elasticity and soothe inflammation. It has a unique creamy texture that provides the structural “backbone” of your whip. However, if you find the natural scent of shea butter too nutty or its texture too heavy, mango butter is a fantastic alternative. Mango butter has a similar fatty acid profile but is slightly firmer and has a very mild, neutral aroma. It is known for its high antioxidant content and its ability to protect the skin from UV damage. Many formulators choose to use a 50/50 blend of both to get the best of both worlds: the unparalleled creaminess of shea and the non-greasy, silky finish of mango butter.
Coconut Oil
Coconut oil serves a dual purpose in this recipe. Firstly, it is naturally antibacterial and antifungal, thanks to its high lauric acid content, which helps keep your skin healthy and clear. Secondly, its unique melting point (around 24 degrees Celsius) is what helps the body butter maintain its whipped structure at room temperature while still melting the moment it touches your skin. Always use the standard, solid-at-room-temperature virgin coconut oil rather than fractionated coconut oil for this specific recipe. Fractionated coconut oil is liquid at all temperatures and will not allow the butter to hold its whipped peaks.
Arrowroot Powder
One common complaint about homemade body butters is that they can feel greasy. This is where arrowroot powder becomes your best friend. By adding a small amount of this natural starch, you can cut through the oiliness and give your final product a “dry” or “silky” finish. It acts as a natural mattifier, helping the oils absorb into the skin more effectively without leaving a heavy residue on your clothes or furniture. It is a simple addition that elevates a basic home recipe into a professional-quality cosmetic product.
The Ultimate DIY Whipped Body Butter Recipe
This recipe is designed to yield a generous amount of fluffy moisturiser that will last for months. It uses a tried-and-tested ratio that ensures stability and a beautiful “peak” when whipped. You can find high-quality versions of these ingredients at specialized suppliers or health food stores. We have focused on using measurements that are easy to follow for beginners while maintaining the precision needed for a consistent result.
Ingredients and Ratios
- 1/2 cup (approx. 115g) Raw Shea Butter: Provides the creamy base and deep nourishment.
- 1/2 cup (approx. 115g) Cocoa Butter or Mango Butter: Adds firmness and a protective barrier. Cocoa butter adds a delicious chocolate scent, while mango is more neutral.
- 1/2 cup (approx. 110g) Virgin Coconut Oil: Helps with the whipping process and adds antimicrobial benefits.
- 1/2 cup (approx. 120ml) Liquid Carrier Oil: Choose [jojoba oil](INTERNAL_LINK) for a light feel or sweet almond oil for extra softening.
- 2 teaspoons Arrowroot Powder: For a non-greasy, professional finish.
- 15-20 drops Essential Oils: Optional for fragrance. Lavender, Sweet Orange, or Frankincense are excellent choices for skin health.
Step-by-Step Instructions
- Melt the Butters: Place your shea butter, cocoa butter, and coconut oil into a heat-safe glass bowl. Set the bowl over a pot of simmering water (a double boiler method) and stir gently until everything is completely liquid. Do not let any water splash into your oils, as this will introduce bacteria and ruin the shelf life. Patience is key here: do not use a microwave, as it can create hot spots that degrade the delicate vitamins in the butters.
- Combine with Carrier Oil: Once melted, remove from the heat and stir in your chosen liquid carrier oil. If you are new to making skincare, you might want to read our guide on [choosing the right carrier oils](INTERNAL_LINK) for your skin type to ensure you are using an oil that won’t clog your pores.
- The Critical Cooling Phase: This is the most important step in the entire process. Place the bowl in the refrigerator for 45 to 60 minutes. You want the mixture to reach a semi-solid state. It should look opaque and firm, but you should still be able to leave a finger indent in it easily. If it gets too hard, you will need to gently re-melt it and try again. If it is too liquid, it will not whip.
- Add the Finishers: Once the mixture is semi-firm, add your arrowroot powder and essential oils. This ensures the scent and the starch are evenly distributed throughout the cream.
- Whip to Perfection: Using a hand mixer or a stand mixer with a whisk attachment, start on a low speed and gradually increase to high. Whip for 5 to 10 minutes. You will see the mixture transform from a yellow, oily paste into a bright white, fluffy cloud. It should look exactly like stiff buttercream frosting and hold its shape when you lift the whisk.
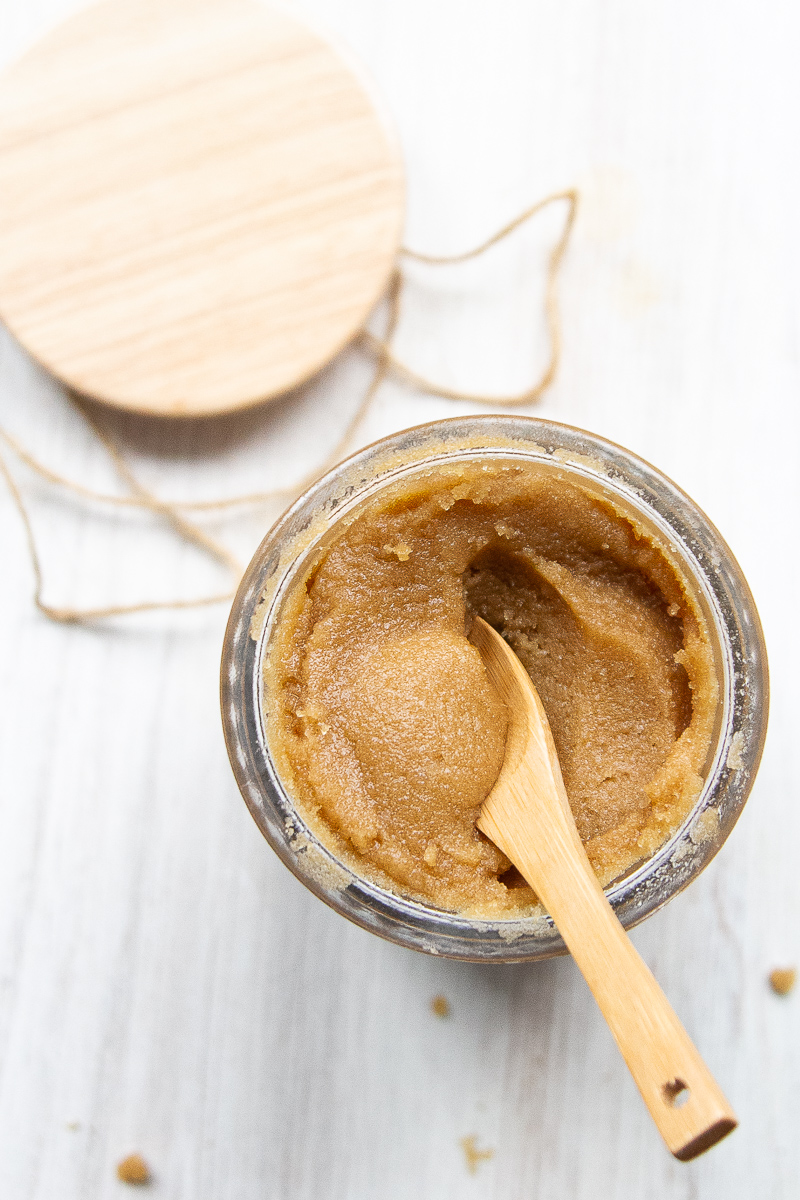
- Jar and Store: Transfer your DIY whipped body butter into clean glass jars. A piping bag can help you get that professional “swirl” look if you are giving these as gifts. Ensure the jars are completely dry before filling.
How to Get the Perfect Whipped Texture Every Time
Achieving that iconic airy texture can be tricky for beginners, but it mostly comes down to temperature control. If your mixture is too warm when you start whipping, it will simply become a liquid oil again. If it is too cold, it will break into hard, lumpy chunks that won’t incorporate air. The “sweet spot” is when the oils have just begun to solidify but remain pliable. If you find your butter is getting too soft while whipping, don’t be afraid to put the bowl back in the freezer for 5 minutes before continuing. The friction of the mixer can actually generate heat, so keeping the bowl cool is a pro secret for the fluffiest results.
Another tip for a superior texture is the choice of butters. Cocoa butter is quite hard at room temperature, which helps the body butter stay whipped even in slightly warmer climates. If you live in a very hot area, increasing the ratio of cocoa butter slightly can prevent your DIY whipped body butter from melting into a liquid in the jar. Conversely, if you find your butter is too hard to spread in winter, you can increase the amount of liquid carrier oil by a tablespoon in your next batch. Remember that because this product contains no wax, it is sensitive to the ambient temperature of your home.
Fragrance and Customisation Options
One of the best parts of making your own skincare is the ability to customise the scent and therapeutic properties. When selecting essential oils, always ensure they are skin-safe and properly diluted. For a relaxing bedtime ritual, a blend of Lavender and Roman Chamomile is unbeatable. If you want something refreshing for the morning, try Grapefruit and Bergamot. Just be cautious with citrus oils, as some can cause photosensitivity if applied before going out into the sun. Always research the specific safety guidelines for any oil you choose to include.
Beyond scent, you can also customise the benefits of your DIY whipped body butter by infusing your carrier oils with herbs. For example, infusing your jojoba oil with dried calendula petals for a few weeks before making your butter can add extra soothing properties for sensitive skin. You can also add a teaspoon of Vitamin E oil during the whipping stage to act as an antioxidant, which helps protect the delicate oils in your recipe from going rancid too quickly. Some formulators even add a tiny pinch of mica powder to give the butter a subtle shimmer on the skin, perfect for summer evenings.
Pro Tips for Success and Safety
To ensure your DIY whipped body butter stays fresh and safe to use, keep these professional tips in mind. Firstly, always work with clean, dry equipment. Since this recipe does not contain preservatives, any introduction of water can lead to bacterial growth. This includes water from your hands or a damp spoon. When using your butter, try to use a small spatula or ensure your hands are completely dry before dipping into the jar. This simple habit will significantly extend the life of your product.
Secondly, consider the shelf life. Because this is an all-natural product made of oils and butters, it will typically stay fresh for 6 to 12 months, depending on the freshness of your initial ingredients. Store your jars in a cool, dark place away from direct sunlight, as light can accelerate the oxidation of the oils. If your body butter does melt in a summer heatwave, don’t worry. It is still perfectly safe to use, though it will lose its fluffy texture and become a dense balm. You can simply re-melt, re-cool, and re-whip it to bring that luxury feel back to life. It is the versatility of these ingredients that makes them so wonderful to work with.
Finally, always perform a patch test before using a new recipe. Apply a small amount of the finished product to the inside of your wrist and wait 24 hours to ensure you don’t have any sensitivities to the essential oils or butters used. This is especially important for those with nut allergies, as shea and cocoa butter are derived from nuts and seeds. While natural ingredients are generally safer, everyone’s skin is unique and can react differently to concentrated plant extracts. Safety should always be your first priority when formulating at home.
Creating your own DIY whipped body butter is more than just a craft: it is an act of self-care. By taking the time to select pure, nourishing ingredients and whip them into a luxurious cream, you are giving your skin the very best that nature has to offer. The process of melting, cooling, and whipping is almost meditative, and the result is a product that rivals any high-end boutique brand. Enjoy the process, experiment with your favourite scents, and revel in the glow of healthy, hydrated skin that you nurtured with your own hands.
You May Also Like