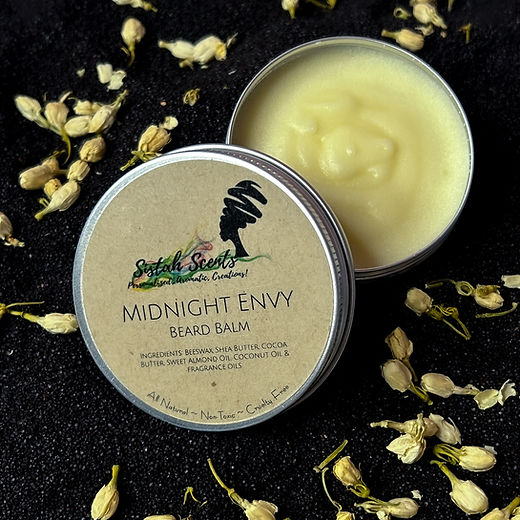
Growing a beard is often seen as a simple matter of patience, but any man who has moved past the initial stubble phase knows that a truly great beard requires more than just time. It requires care, hydration, and the right styling tools to keep it looking sharp rather than scruffy. As the popularity of facial hair continues to rise, so does the demand for high quality grooming products. However, many commercial options are filled with synthetic fragrances and preservatives that can irritate the skin. This is where a DIY beard balm recipe becomes an essential part of your grooming arsenal. By making your own balm at home, you gain complete control over the ingredients, ensuring that every drop of oil and every gram of butter serves a purpose. Whether you are a beginner or an experienced formulator, creating a custom beard balm is a rewarding process that results in a professional grade product tailored to your specific needs.
What Does Beard Balm Do and How Does It Differ from Butter?
Before diving into our DIY beard balm recipe, it is important to understand why this product is such a game changer for men’s grooming. Beard balm is a multi-functional product designed to address three main concerns: conditioning the hair, moisturising the skin underneath, and providing a light hold for styling. Unlike beard oil, which is primarily a liquid moisturiser, balm has a thicker consistency thanks to the addition of waxes and butters. This texture allows it to sit on the hair slightly longer, providing a protective barrier against environmental stressors like wind and cold air.
The first benefit is conditioning. Beard hair is naturally coarser and drier than the hair on your head. Without regular hydration, it can become brittle, leading to split ends and a scratchy texture. A well-formulated balm penetrates the hair shaft to soften it from the inside out. Secondly, the skin beneath a beard is often neglected. As the hair grows, it draws moisture away from the skin, leading to dryness and itching. The oils in a beard balm help to replenish this lost moisture, soothing the skin and preventing irritation. Finally, the inclusion of beeswax in a DIY beard balm recipe provides a light to medium hold, which is crucial for taming flyaway hairs and shaping the beard into a polished look.
In the world of men’s grooming, balm and butter are often confused. The primary difference lies in the ratio of wax to butter. Beard butter is typically made with a very high percentage of shea or cocoa butter and a very low percentage of wax. This results in a soft, creamy product that focuses almost entirely on deep conditioning. Beard balm, on the other hand, contains a significant amount of beeswax. This gives the product a firmer structure and provides the tacky quality needed to hold hairs in place. While it still offers plenty of moisture, its primary role is to act as a daytime styling and protection agent.
Why You Need This DIY Beard Balm Recipe in Your Routine
The beauty of this specific DIY beard balm recipe lies in its simplicity and the powerhouse ingredients we have selected. We have chosen a blend of beeswax, shea butter, argan oil, and jojoba oil to create a balanced formula that works for all beard types. Each of these ingredients has been picked for its unique ability to support hair health and skin comfort. When you combine them, you create a synergistic effect that far outperforms many store bought alternatives.
Beeswax is the backbone of any good beard balm, providing the necessary structure and acting as a natural humectant to lock in moisture. Shea butter is incredibly rich in vitamins A and E, offering deep hydration and a creamy texture that makes the balm easy to spread. For the liquid oils, argan oil adds shine and manageability, while jojoba oil mimics the natural sebum produced by our skin, making it an incredible [moisturiser for the skin](INTERNAL_LINK) and hair. Finally, we have chosen a classic, masculine blend of cedarwood and sandalwood essential oils. Cedarwood provides a warm, woody aroma and natural antiseptic benefits, while sandalwood adds a sophisticated depth and helps to soothe any [irritated skin](INTERNAL_LINK) beneath the beard.
The Ultimate DIY Beard Balm Recipe
This DIY beard balm recipe is designed to be straightforward and accessible. We will be using a double boiler method to ensure that the butters and oils are heated gently. This batch makes approximately 100 grams of balm, which will last for several months depending on the length of your beard. You will need a clean, dry glass jar or a small tin to store your finished product.
- Beeswax Pellets: 25g (approx. 2 tbsp) – Provides the hold and structure.
- Shea Butter: 30g (approx. 2 tbsp) – For creaminess and deep moisture.
- Jojoba Oil: 20g (approx. 1.5 tbsp) – To nourish the skin and mimic natural sebum.
- Argan Oil: 20g (approx. 1.5 tbsp) – To soften the hair and add a healthy shine.
- Cedarwood Essential Oil: 10 drops – For a woody, grounding scent.
- Sandalwood Essential Oil: 5 drops – For a creamy, sophisticated fragrance.
- Prepare Your Double Boiler: Fill a small saucepan with a few centimetres of water and bring it to a simmer. Place a heat-safe glass bowl over the top.
- Melt the Ingredients: Add the beeswax pellets and shea butter to the bowl. Stir occasionally until both have completely melted. Pour in the jojoba and argan oils and stir well to combine.
- Cool and Scent: Remove from the heat and let it sit for two minutes. Add your cedarwood and sandalwood drops and give it a final stir.
- Pour and Set: Carefully pour the liquid balm into your storage tin. Leave it undisturbed on a flat surface for at least two hours to set.
How to Apply Your Natural Beard Balm Like a Pro
To get the most out of your DIY beard balm recipe, follow these simple steps. Start with a clean, towel-dried beard. Using the back of your thumbnail, scoop out a small amount of balm, about the size of a pea for a short beard or a marble for a longer one. Rub your palms together until the balm has completely melted into a warm oil. Massage the product into your beard, starting from the neck and working your way up. Be sure to use your fingertips to reach the skin underneath, as this is where the moisturising benefits are needed most. Finally, use a [boar bristle brush](INTERNAL_LINK) or a wooden comb to distribute the product evenly and style your beard into your desired shape.
For those with shorter beards, the focus should be primarily on the skin. You will only need a tiny amount of balm to keep the hair soft and prevent the itchiness that often comes with new growth. If you have a long, thick, or particularly coarse beard, you will likely need to be more generous with your application. Coarse hair tends to soak up moisture quickly, so you may even find that a second application in the afternoon helps to keep it looking fresh. Pay extra attention to the ends of the beard, as these are the oldest parts of the hair and are most prone to splitting and dryness.
Pro Tips for Customising Your Beard Balm
One of the best things about making your own grooming products is the ability to experiment. Once you have mastered the basic DIY beard balm recipe, you can start to tweak it to suit your personal preferences. If you find the balm is too soft for the Australian summer heat, try increasing the beeswax by five grams. Conversely, if it feels too hard in winter, add an extra teaspoon of jojoba oil to the mix. You can also experiment with different scent profiles. While cedarwood and sandalwood are classics, you might enjoy a refreshing citrus blend with bergamot and lime. Just remember to always use high quality, skin-safe essential oils and to research the proper dilution rates.
Safety and Storage for Your Homemade Balm
Because this DIY beard balm recipe does not contain water, it does not require a synthetic preservative. Always use clean, dry hands when scooping out the product to avoid introducing bacteria into the tin. Store your balm in a cool, dark place away from direct sunlight, as heat can cause the oils to go rancid over time. When stored correctly, your homemade beard balm should remain fresh and effective for six to twelve months. Before using your new balm for the first time, we always recommend performing a patch test. Apply a small amount of the product to the inside of your wrist or elbow and wait 24 hours to ensure you do not have any adverse reactions. Creating your own grooming products is a simple yet powerful way to take control of your self care routine. By following this DIY beard balm recipe, you are not just saving money: you are investing in the long term health and appearance of your beard. Happy formulating!
You May Also Like