How to Make Refillable Solid Shampoo Bars at Home
The beauty industry is facing a plastic crisis, with billions of shampoo bottles ending up in landfills and oceans every year. For those looking to reduce their environmental footprint without sacrificing hair health, learning a solid shampoo bar recipe DIY is one of the most rewarding steps you can take. These compact, powerful bars eliminate the need for single-use plastic packaging while offering a salon-quality cleanse that is gentle on both your scalp and the planet. Whether you are a sustainability enthusiast or a home formulator, making your own shampoo bars allows you to control exactly what goes into your hair care routine, ensuring every ingredient is ethical, effective, and tailored to your needs.
In this comprehensive guide, we will walk you through everything you need to know to create professional-grade, refillable solid shampoo bars at home. We will explore the science behind why these bars work, the essential ingredients that provide that perfect lather, and a step-by-step solid shampoo bar recipe DIY that is easy to follow even for beginners. By the end of this article, you will be equipped with the knowledge to formulate your own zero-waste hair care solutions, saving money and reducing waste one wash at a time. Let’s dive into the world of solid hair care and discover how a small change in your bathroom can lead to a big impact on the world around you.
What Is a Solid Shampoo Bar?
A solid shampoo bar is a concentrated, water-free alternative to traditional liquid shampoo. Unlike soap bars, which are made through the saponification of oils and fats, high-quality shampoo bars are formulated with gentle surfactants that match the natural pH of your hair. This distinction is crucial because soap-based bars can be too alkaline, leading to dryness, tangles, and long-term damage to the hair cuticle. By removing the water content, we eliminate the need for bulky plastic bottles and create a product that is both potent and portable.
When you use a solid shampoo bar recipe DIY approach, you are essentially creating a “syndet” (synthetic detergent) bar. These bars are designed to cleanse effectively while maintaining the hair’s natural moisture balance. They are typically made by combining powdered surfactants with nourishing butters and conditioning agents. The result is a hard, long-lasting bar that provides a rich, creamy lather without the harsh sulfates often found in commercial liquid products. This makes them an ideal choice for anyone looking to simplify their beauty routine while embracing more sustainable, ethical practices.
Benefits of Solid Shampoo Bars for Hair
Switching to a solid shampoo bar offers numerous advantages that extend beyond just reducing plastic waste. Here are some of the key benefits for your hair and the planet:
- Zero Waste and Eco-Friendly: One of the most compelling reasons to switch is the environmental impact. A single shampoo bar can replace up to three plastic bottles of liquid shampoo, significantly reducing your household’s plastic footprint.
- Travel-Friendly and Convenient: Because they are solid, these bars are not subject to liquid restrictions at airports. They are lightweight, compact, and won’t leak in your luggage, making them the ultimate travel companion.
- Gentle and Sulfate-Free: Many DIY recipes use Sodium Cocoyl Isethionate (SCI), often called “baby foam” because it is so gentle. Unlike harsh sulfates like SLS, these surfactants cleanse without stripping the hair of its natural oils.
- Cost-Effective Longevity: A well-made shampoo bar lasts much longer than a standard bottle of shampoo. Depending on your hair length and washing frequency, one bar can last for 60 to 80 washes.
- Highly Customisable: When you make your own bars, you have complete control over the ingredients. You can tailor the recipe to suit your specific hair needs by adjusting the choice of butters and essential oils.
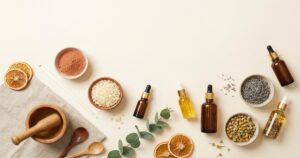
What You Need
To create a professional-quality solid shampoo bar at home, you will need a combination of surfactants, conditioners, and hardeners. This solid shampoo bar recipe DIY is designed to be balanced and effective for most hair types. Ensure you have a digital scale for precise measurements, as formulation is more like chemistry than cooking.
- Sodium Cocoyl Isethionate (SCI) Powder (50%): The primary gentle surfactant that provides excellent lather.
- Cocamidopropyl Betaine (10%): A liquid co-surfactant that helps boost foam and mildness.
- Cocoa Butter or Shea Butter (15%): Provides hardness to the bar and conditioning for the hair.
- Cetyl Alcohol (10%): An oil-soluble fatty alcohol that acts as a hardener and provides “slip” for easier detangling.
- BTMS-50 or BTMS-25 (8%): A conditioning emulsifier that leaves hair feeling soft and silky.
- Panthenol (Pro-Vitamin B5) (2%): A humectant that strengthens the hair shaft and adds shine.
- Essential Oils (Lavender or Rosemary) (2%): For a natural scent and therapeutic benefits for the scalp.
- Broad-Spectrum Preservative (e.g., Preservative Eco) (1%): Essential for any product that will be kept in a wet environment like a shower.
- Citric Acid (optional): To adjust the pH to the ideal range of 4.5 to 5.5.
Step-by-Step Recipe: How to Do It
Follow these steps carefully to ensure your shampoo bars are hard, effective, and safe to use. Preparation is key, so gather all your tools and ingredients before you begin.
- Safety First: Before you start, put on a dust mask. SCI powder is very fine and can be irritating if inhaled. Work in a well-ventilated area and wear gloves to maintain hygiene.
- Melt the Oil Phase: In a double boiler or a heat-proof container over a water bath, combine the cocoa butter, cetyl alcohol, and BTMS-50. Heat gently until everything has completely melted into a clear liquid.
- Combine the Surfactants: While the oils are melting, weigh out your SCI powder in a separate bowl. Once the oils are ready, slowly stir in the SCI powder and the Cocamidopropyl Betaine. Mix thoroughly until a thick, dough-like paste forms.
- Cool Down Phase: Remove the mixture from the heat and let it cool slightly. Once the temperature drops below 40°C, add your essential oils, panthenol, and the preservative. This ensures that the heat doesn’t degrade the delicate active ingredients.
- Test the pH: Take a small amount of the mixture, dissolve it in a little distilled water, and test the pH with a strip or meter. If it is too high, add a tiny pinch of citric acid until it reaches the 4.5–5.5 range.
- Mould the Bars: Press the warm mixture firmly into silicone moulds. Use your fingers or the back of a spoon to pack it in tightly to avoid air bubbles and ensure a smooth finish.
- Harden and Cure: Place the moulds in the freezer for about 30 minutes to help them set, then pop them out. Allow the bars to air dry and “cure” in a cool, dry place for 24 to 48 hours before use. This makes them harder and longer-lasting.
Tips for Best Results
Creating the perfect bar takes a bit of practice, but these tips will help you achieve professional results from your very first batch of solid shampoo bar recipe DIY:
- Control the Dust: If you find the SCI powder too difficult to work with, you can buy it in “noodle” or “granule” form. However, for a smooth bar, you may need to grind these down or melt them more thoroughly with the liquid surfactants.
- Proper Storage is Key: To make your bars last as long as possible, never let them sit in a puddle of water. Use a well-draining soap dish or a hanging mesh bag to allow the bar to dry completely between uses.
- Customise for Your Hair Type: If you have very dry hair, increase the percentage of cocoa butter slightly. For oily hair, you might reduce the butter and add a small amount of Kaolin clay to help absorb excess sebum.
Safety and Patch Testing
Even though we are using gentle, natural-derived ingredients, safety is paramount. Always handle concentrated surfactants with care and avoid direct contact with eyes. Before using your new shampoo bar for the first time, perform a patch test. Rub a small amount of the lather on the inside of your elbow and wait 24 hours to ensure no irritation occurs. If you have a known sensitivity to specific essential oils or surfactants, always consult the Safety Data Sheet (SDS) for each ingredient before formulating.
Frequently Asked Questions
Do I need a transition period when switching to shampoo bars?
If you are using a surfactant-based bar like this one, there is usually no transition period. Unlike soap-based bars, these match your hair’s pH, so you won’t experience the “waxy” buildup often associated with natural soap. Your hair should feel clean and soft from the very first wash.
Are solid shampoo bars safe for colour-treated hair?
Yes! Because this recipe is sulfate-free and pH-balanced, it is much gentler on hair dye than many commercial liquid shampoos. The inclusion of conditioning agents like BTMS-50 also helps to seal the hair cuticle, which can actually help your colour last longer.
How many washes can I expect from one bar?
A standard 60-80g bar typically lasts for 60 to 80 washes, depending on your hair length and how well you store it. This is roughly equivalent to two or three 250ml bottles of liquid shampoo, making it a highly sustainable and economical choice for your beauty routine.
Conclusion
Making your own solid shampoo bars is a rewarding way to take control of your hair care routine while making a positive impact on the environment. This solid shampoo bar recipe DIY provides a professional-grade foundation that you can tweak and refine as you become more confident in your formulating skills. Not only will your hair thank you for the gentle, nourishing ingredients, but you will also enjoy the satisfaction of a clutter-free, plastic-free bathroom. Ready to start your zero-waste journey? Grab your ingredients and give this recipe a try today—your hair (and the planet) will love you for it!
You May Also Like