How to Make a Vegan Body Butter Without Beeswax
The beauty industry is undergoing a significant transformation as more enthusiasts embrace ethical and sustainable skincare. For many, transitioning to a plant-based routine means finding high-quality alternatives to common animal-derived ingredients. One of the most sought-after swaps is finding a vegan body butter recipe without beeswax. While beeswax is a traditional staple for thickening balms and salves, it is not the only option for achieving that luxurious, creamy texture we all love in a high-end moisturiser. By opting for plant-based waxes and nutrient-dense botanical butters, you can create a professional-grade product that is both cruelty-free and incredibly effective at nourishing your skin.
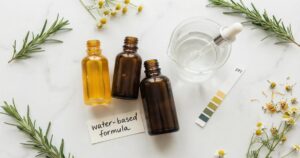
Making your own skincare at home is a rewarding way to take control of what goes onto your body. This vegan body butter recipe without beeswax focuses on using sustainable ingredients like candelilla wax and organic shea butter to provide deep hydration without compromising your ethical values. Whether you are a seasoned home formulator or a beginner looking to dip your toes into DIY beauty, this guide will walk you through the process of crafting a whipped, airy body butter that rivals any store-bought alternative. Let’s explore how you can achieve the perfect consistency and skin-feel using only the finest plant-derived ingredients available to the modern maker.
What Is Vegan Body Butter?
Body butter is a thick, concentrated moisturiser that differs from traditional lotions because it is anhydrous, meaning it contains no water. Traditional lotions are typically emulsions of water and oil, requiring preservatives to stay shelf-stable. In contrast, a vegan body butter is a blend of plant-based fats and waxes that provides an intensive barrier for the skin. When we talk about a “vegan” version, we are specifically excluding ingredients like beeswax, honey, or lanolin, which are commonly found in standard formulations. Instead, we rely on the natural hardening properties of plant waxes to give the product its structure and stability.
The key to a successful vegan body butter recipe without beeswax lies in selecting the right plant-based thickener. Candelilla wax, derived from the leaves of the small Candelilla shrub, is the most popular choice. It is denser than beeswax, meaning you typically need less of it to achieve the same level of firmness. Other options include soy wax or carnauba wax, though candelilla is often preferred for its smooth application and gloss. By combining these waxes with rich butters like shea or cocoa, you create a plant-based moisturiser that melts upon contact with the skin, delivering nutrients directly to where they are needed most.
Benefits of Vegan Body Butter for Skin
Switching to a vegan formulation offers numerous advantages, both for your skin health and the environment. Here are the primary benefits of using a vegan body butter recipe without beeswax:
Intense and Long-Lasting Hydration: Because body butters are made entirely of fats, they are exceptionally good at preventing transepidermal water loss (TEWL). The plant butters, such as shea and cocoa, are rich in essential fatty acids that penetrate the skin’s surface to provide deep nourishment. This makes them ideal for treating very dry areas like elbows, knees, and heels, providing a level of hydration that lightweight lotions simply cannot match.
Ethical and Sustainable Choice: Choosing a cruelty-free skincare routine is a powerful way to support ethical beauty standards. By avoiding beeswax, you are opting for a bee-friendly alternative that does not rely on commercial beekeeping practices. This aligns with a broader commitment to sustainability and ethical beauty, ensuring that your self-care routine has a minimal impact on the planet’s delicate ecosystems.
Rich in Antioxidants and Vitamins: Plant-based butters are natural powerhouses of Vitamin A and Vitamin E. These antioxidants help to protect the skin from environmental stressors and free radicals, which can lead to premature ageing. Shea butter, in particular, is known for its anti-inflammatory properties, making it a soothing choice for irritated or sensitive skin types.
Strong Barrier Protection: The addition of candelilla wax creates a breathable, protective layer on the skin. This barrier helps to lock in the moisture provided by the butters while shielding the skin from harsh weather conditions, such as wind and cold. Unlike synthetic petroleum-based products, plant waxes allow the skin to breathe while still providing superior protection.
Highly Customisable: One of the best parts of a DIY vegan lotion is the ability to tailor it to your specific needs. You can choose different carrier oils based on your skin type—such as jojoba oil for oily skin or sweet almond oil for dry skin—and add your favourite essential oils for a personalised scent profile that doubles as aromatherapy.
What You Need
- 1/2 cup Shea Butter: Provides the creamy base and is rich in Vitamin E.
- 1/4 cup Cocoa Butter: Adds firmness and a delicious, subtle chocolate scent.
- 1/4 cup Sweet Almond Oil: A lightweight carrier oil that absorbs easily into the skin.
- 1 tablespoon Candelilla Wax: The essential plant-based alternative to beeswax.
- 1 teaspoon Vitamin E Oil: Acts as a natural antioxidant to extend the shelf life of the oils.
- 15 drops Essential Oil: Optional, but recommended for fragrance (e.g., Lavender or Sweet Orange).
Step-by-Step Recipe
- Melt the Solids: Place the shea butter, cocoa butter, and candelilla wax into a heat-safe glass bowl. Set the bowl over a pot of simmering water (a double boiler) and stir occasionally until everything is completely melted and clear. Avoid direct high heat.
- Combine with Carrier Oil: Once melted, remove the bowl from the heat. Carefully stir in the sweet almond oil until the mixture is well combined.
- Initial Cooling: Let the mixture sit at room temperature for about 20 minutes, then place it in the refrigerator. You want the mixture to cool until it starts to solidify but is still soft enough to leave a fingerprint when pressed. This usually takes 30 to 60 minutes.
- Add Final Ingredients: Take the bowl out of the fridge. Add the Vitamin E oil and your chosen essential oils. At this stage, the mixture should look somewhat opaque and have a soft, buttery consistency.
- Whip to Perfection: Using a hand mixer or a stand mixer, whip the mixture on high speed for 5 to 10 minutes. You will see it transform from a yellow oil-based liquid into a white, fluffy, and voluminous cream that looks like stiff whipped cream.
- Store Properly: Gently spoon the whipped butter into a clean, dry glass jar. Label your creation with the date it was made.
Tips for Best Results
Achieving the perfect whipped shea butter consistency can take a little practice. Here are some expert tips to ensure your vegan body butter recipe without beeswax turns out perfectly every time:
Temperature Control is Key: If your mixture is too liquid when you start whipping, it won’t hold the air bubbles and will eventually collapse. If it’s too hard, it will be difficult to whip and may become chunky. Aim for that “soft-set” stage where it is firm but yielding. If you miss the window and it gets too hard, simply melt it down slightly and try again.
Preventing Graininess: Shea butter can sometimes become grainy if it cools too slowly. To prevent this, make sure to cool your mixture relatively quickly in the fridge rather than leaving it on the counter for hours. Some formulators also prefer to “temper” their shea butter by heating it to 70°C for 20 minutes before starting the recipe.
Storage Matters: Since this product is made of oils and butters, it will melt if left in a hot car or a sunny windowsill. In the Australian summer, you might find it helpful to store your body butter in a cool, dark cupboard or even the refrigerator to maintain its whipped texture.
Safety and Patch Testing
Even though this recipe uses natural, plant-based ingredients, it is still important to practice safety. Always perform a patch test before applying a new DIY product to your entire body. Apply a small amount of the finished body butter to the inside of your wrist or elbow and wait 24 hours to ensure no irritation occurs. This is especially important if you are using essential oils or have a known nut allergy, as many carrier oils are derived from nuts. Additionally, ensure all your equipment and jars are thoroughly cleaned and dried before use to prevent any contamination.
Frequently Asked Questions
Can I use soy wax instead of candelilla wax?
Yes, soy wax can be used as a vegan alternative, but it is generally softer than candelilla wax. If you choose to use soy wax, you may need to increase the amount slightly to achieve the same level of firmness.
Why did my body butter turn grainy?
Graininess in whipped shea butter is usually caused by the crystallization of stearic acid during the cooling process. To fix this, you can gently re-melt the body butter and cool it rapidly in the freezer or an ice bath while stirring. This forces the fats to solidify at the same time, resulting in a much smoother texture.
How long does DIY vegan body butter last?
Since this recipe does not contain water, it has a relatively long shelf life of 6 to 12 months. Adding Vitamin E oil helps to slow down the oxidation process, but you should always check for changes in scent or colour, which could indicate that the oils have gone rancid.
Conclusion
Creating a vegan body butter recipe without beeswax is a fantastic way to elevate your skincare routine while staying true to your ethical principles. This luxurious, whipped moisturiser provides the perfect balance of deep hydration and barrier protection, all while remaining completely plant-based and cruelty-free. By mastering the art of using candelilla wax and botanical butters, you can craft a professional-quality product that leaves your skin feeling soft, supple, and healthy.
You May Also Like