DIY Aloe Vera Gel Moisturiser for Oily and Acne-Prone Skin
Struggling with a complexion that feels like an oil slick by midday? You are not alone. Finding the perfect balance between hydration and oil control is the ultimate challenge for those of us with oily and acne-prone skin. Many commercial products promise a “matte finish” only to leave your skin feeling stripped, tight, and eventually even oilier as your sebaceous glands overcompensate. This is where a DIY aloe vera gel moisturiser comes to the rescue, offering a lightweight, breathable solution that hydrates without clogging your pores.
In this guide, we will explore why aloe vera is a holy grail ingredient for home formulators and how you can create your own customised DIY aloe vera gel moisturiser in just a few simple steps. By choosing high-quality, non-comedogenic ingredients, you can say goodbye to heavy, greasy creams and hello to a balanced, glowing complexion. Whether you are a complete beginner or a seasoned DIY enthusiast, this recipe is designed to be practical, effective, and perfectly suited to the Australian climate.
What Is Aloe Vera Gel?
Aloe vera gel is the clear, jelly-like substance found inside the thick, succulent leaves of the Aloe barbadensis plant. It has been used for centuries in traditional medicine and skincare due to its remarkable healing and hydrating properties. Unlike heavy oils or butters, aloe vera gel is primarily composed of water (about 99%), but it is that remaining 1% that holds the magic. This small fraction contains over 75 active constituents, including vitamins (A, C, and E), minerals, enzymes, salicylic acids, and amino acids.
For those with oily skin, aloe vera acts as a natural humectant. This means it draws moisture from the air into the skin, providing lightweight hydration without the need for occlusive oils that can often feel too heavy. When used as a base for a DIY aloe vera gel moisturiser, it creates a cooling, soothing barrier that sinks in almost instantly. It is particularly effective for those dealing with “dehydrated oily skin”—a common condition where the skin lacks water but still produces excess oil. By replenishing that water content, aloe vera helps signal to your skin that it doesn’t need to pump out as much sebum.
Benefits of Aloe Vera Gel for Skin
When it comes to managing oily and acne-prone skin, aloe vera is a powerhouse ingredient. Here are the top benefits of incorporating it into your daily routine:
- Natural Sebum Control: Aloe vera contains zinc, which acts as a natural astringent to tighten pores and help regulate sebum control. Regular use can help reduce that unwanted midday shine.
- Anti-Inflammatory Properties: If you suffer from active breakouts, you know how painful and red they can be. Aloe vera is rich in acemannan and other polysaccharides that calm inflammation and reduce redness, helping your skin heal faster.
- Antibacterial and Antimicrobial: Aloe vera naturally contains salicylic acid and sulfur, both of which are known to fight acne-causing bacteria. This makes it an excellent preventative measure against future pimples.
- Gentle Wound Healing: The plant hormones auxins and gibberellins found in aloe vera stimulate the growth of new cells. This is crucial for healing acne scars and preventing post-inflammatory hyperpigmentation.
- Soothing Cooling Effect: Especially in the harsh Australian sun, the cooling sensation of aloe vera provides immediate relief to irritated or sun-exposed skin, making it a refreshing addition to any skincare regimen.
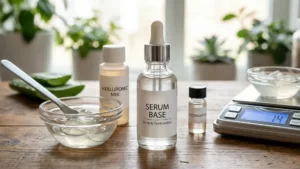
What You Need
To create a high-quality DIY aloe vera gel moisturiser, you will need a few key ingredients. We recommend using non-comedogenic oils to ensure your pores stay clear and happy. Here is your shopping list:
- 1/2 cup Pure Aloe Vera Gel (Look for high-purity, cold-pressed gel without added colours or fragrances)
- 1 tablespoon Hemp Seed Oil or Jojoba Oil (These are excellent non-comedogenic oils that mimic your skin’s natural sebum)
- 1 teaspoon Witch Hazel (Ensure it is alcohol-free to act as a natural astringent without drying out your skin)
- 3 drops Tea Tree Essential Oil (A powerful tea tree essential oil addition for its antibacterial properties)
- 3 drops Lavender Essential Oil (To soothe irritation and provide a calming scent)
- 1/2 teaspoon Vitamin E Oil (Optional, acts as an antioxidant for the skin and helps extend the shelf life slightly)
Step-by-Step Recipe
Creating your own DIY aloe vera gel moisturiser is a straightforward process. Follow these steps to ensure a stable and effective blend:
- Sanitise Your Workspace: Before you begin, thoroughly clean and sanitise all your tools, including your mixing bowl, whisk, and the final storage container. Use 70% isopropyl alcohol to ensure no bacteria are introduced to your fresh moisturiser.
- Prepare the Base: Scoop 1/2 cup of pure aloe vera gel into your mixing bowl. If you are using gel directly from a plant, ensure you have removed the yellow aloin sap, as this can be irritating to the skin. However, for a smoother consistency and better shelf life, a high-quality store-bought pure gel is often easier for beginners.
- Incorporate the Carrier Oil: Slowly add your chosen carrier oil (hemp seed or jojoba). Use a small whisk or a clean spoon to blend the oil into the gel. You will notice the mixture turning slightly opaque as it emulsifies. Continue whisking until the oil is fully integrated and no longer sitting on top.
- Add the Astringent: Stir in the teaspoon of alcohol-free witch hazel. This helps to further refine the texture and adds an extra layer of pore-tightening benefits.
- Add Essential Oils and Vitamin E: Carefully drop in your tea tree and lavender essential oils, followed by the vitamin E oil. Whisk one final time to ensure all the active ingredients are evenly distributed throughout the gel.
- Transfer and Store: Using a small funnel or a steady hand, transfer your DIY aloe vera gel moisturiser into a clean glass jar or a pump bottle. A pump bottle is ideal as it minimises air exposure and prevents you from introducing bacteria with your fingers.
Tips for Best Results
To get the most out of your homemade creation, keep these practical tips in mind:
- Keep it Cool: Store your moisturiser in the refrigerator. Not only does this extend the shelf life of the fresh ingredients, but the cold temperature also helps to constrict blood vessels and reduce puffiness when applied in the morning.
- Apply to Damp Skin: For maximum lightweight hydration, apply your aloe moisturiser to slightly damp skin. This helps the humectants in the aloe vera lock in even more moisture.
- Batch Size Matters: Because this recipe uses fresh ingredients without strong synthetic preservatives, it is best to make small batches that you can use within 2 to 3 weeks. If you notice any change in smell or colour, it is time to whip up a fresh batch.
- Customise Your Oils: If your skin feels particularly congested, stick with hemp seed oil. If you have combination skin with some dry patches, jojoba oil might be a better fit as it is slightly more nourishing.
Safety and Patch Testing
Even natural ingredients can cause reactions in some individuals. Before applying your new DIY aloe vera gel moisturiser to your entire face, it is essential to perform a patch test. Apply a small amount of the gel to the inside of your wrist or behind your ear. Wait 24 hours to ensure no redness, itching, or irritation occurs. If you have a known allergy to the Liliaceae family (which includes onions and garlic), be extra cautious with aloe vera. Always avoid the delicate eye area and discontinue use immediately if any adverse reaction develops.
Frequently Asked Questions
Can I use fresh aloe vera from my garden?
Yes, you can! However, fresh aloe vera contains no preservatives and will spoil very quickly (within a few days). If you use fresh gel, you must store it in the fridge and make very small batches. Also, ensure you drain the yellow “latex” (aloin) from the leaf before scooping out the clear gel, as it can be a skin irritant.
Will this moisturiser make me break out?
The ingredients in this DIY aloe vera gel moisturiser are specifically chosen for being non-comedogenic, meaning they are unlikely to clog pores. However, everyone’s skin is unique. By using high-quality non-comedogenic oils like hemp or jojoba, you are giving your skin the best chance at staying clear while remaining hydrated.
How long does this DIY moisturiser last?
When stored in the refrigerator in a clean, airtight container, this moisturiser typically lasts about 2 to 3 weeks. If you add vitamin E, it may help protect the oils from going rancid, but it won’t stop microbial growth. For a longer-lasting product, you would need to add a broad-spectrum natural preservative.
Conclusion
Taking control of your skincare routine doesn’t have to be complicated or expensive. By making your own DIY aloe vera gel moisturiser, you are providing your oily or acne-prone skin with exactly what it needs: soothing, lightweight hydration without the heavy fillers found in many commercial products. This simple recipe empowers you to customise your ingredients and ensure that only the best, most natural elements touch your face. Give it a try this week and experience the refreshing, balancing power of aloe vera for yourself. Your skin will thank you for the extra care and attention!
You May Also Like