How to Patch Test New Skincare Ingredients Safely at Home
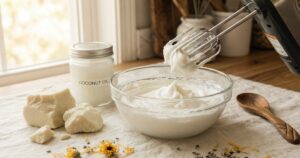
Starting your journey into the world of DIY skincare is an incredibly rewarding experience. There is a unique sense of satisfaction that comes from blending your own botanical oils, formulating a bespoke moisturiser, or whisking up a fresh face mask using ingredients you have personally selected. However, as any seasoned home formulator will tell you, with great creativity comes the responsibility of ensuring your creations are safe for your skin. Even the most natural, high-quality ingredients can sometimes cause unexpected reactions, which is why learning how to patch test skincare is the most critical skill you can master before you start applying your latest concoction to your face.
Many beginners are tempted to skip this step in their excitement to try a new recipe, but doing so can lead to uncomfortable skin irritation or even a full-blown allergic reaction. Patch testing is a simple, proactive method used to determine if a specific ingredient or finished product will cause an adverse response on your skin. By isolating a small area for testing, you can safely identify potential issues before they become widespread problems. In this guide, we will walk you through the essential steps to perform a patch test at home, ensuring your DIY skincare hobby remains a joyful and irritation-free pursuit.
What Is Patch Testing?
Patch testing is a diagnostic method used to identify whether a substance causes inflammation or an allergic response when it comes into contact with the skin. In a professional clinical setting, this often involves applying various allergens to the back under adhesive patches for several days. However, for the home formulator, the process follows the same core principles of safety and observation. When we talk about how to patch test skincare at home, we are referring to the practice of applying a small amount of a new raw ingredient—such as an essential oil, a new carrier oil, or a botanical extract—to a discreet area of skin to monitor for any negative changes.
There are generally two types of reactions that patch testing helps to identify. The first is irritant contact dermatitis, which is a non-allergic skin reaction that occurs when a substance damages the skin’s outer protective layer. This often shows up quickly as redness, itching, or a stinging sensation. The second is allergic contact dermatitis, which is a delayed hypersensitivity reaction where your immune system reacts to a specific ingredient. This type of reaction can take several days to appear, which is why patience is such a vital part of the testing process. By understanding these distinctions, you can better interpret what your skin is trying to tell you during your home tests.
Benefits of Patch Testing for Skin
The primary benefit of patch testing is the prevention of widespread skin damage. When you are working with concentrated ingredients like essential oils or active botanical extracts, the risk of a reaction is higher than with pre-made, store-bought products. Patch testing acts as your first line of defence against potential disasters, allowing you to catch a reaction on a tiny, hidden patch of skin rather than across your entire face or body. This is especially important for those with sensitive skin who may react to ingredients that others find perfectly benign.
Beyond basic safety, patch testing also helps you understand the unique compatibility between your skin and specific ingredients. Not every “hero” ingredient in the skincare world will suit every individual. For instance, while rosehip oil is celebrated for its regenerative properties, it may cause breakouts for some people. By testing it first, you can organise your formulation cupboard based on what truly works for you, saving you both time and money. Furthermore, it provides immense peace of mind. Knowing that your new DIY serum has been thoroughly tested allows you to enjoy your skincare routine with confidence, free from the anxiety of wondering if you will wake up with a rash the next morning.
Finally, regular patch testing fosters a deeper connection with your skin’s needs and responses. As a home formulator, you are essentially a scientist in your own personal laboratory. Taking the time to observe how your skin reacts to different substances helps you become more intuitive about your skin’s health. You will begin to notice subtle signs of skin irritation or improvement that you might have previously overlooked. This heightened awareness is invaluable when it comes to fine-tuning your recipes and achieving the best possible results for your specific skin type.
What You Need
Before you begin, it is helpful to gather a few simple supplies to make the process as accurate and clean as possible. You do not need any specialised equipment, but having these items on hand will help you organise your testing routine effectively.
- The new ingredient or DIY product you wish to test.
- A small supply of cotton buds or a clean glass stirring rod for application.
- Hypoallergenic medical tape or a standard band-aid.
- A mild, fragrance-free cleanser to prep the area.
- A notebook or a digital app to record the date, time, and any observations.
Step-by-Step Guide: How to Patch Test Skincare at Home
Performing a patch test is a straightforward process, but it requires discipline and a bit of patience to ensure the results are reliable. Follow these steps to correctly identify how your skin responds to a new substance.
- Select Your Test Area: Choose a clean, discreet area of skin where the product won’t be easily rubbed off. The inner forearm, the side of the neck, or the area just behind the ear are excellent choices.
- Cleanse the Skin: Gently wash the chosen area with a mild, fragrance-free cleanser and pat it dry with a clean towel. It is important to remove any existing oils, sweat, or other products that might interfere with the test results.
- Apply the Ingredient: Using a clean cotton bud or your fingertip, apply a small, concentrated amount of the ingredient to the test spot. If you are testing an essential oil, it must be diluted in a carrier oil first at the appropriate safety percentage.
- Wait and Observe: Leave the area undisturbed for at least 24 hours. During this time, avoid getting the test spot wet or applying any other products to it. If you experience any immediate burning, intense itching, or visible swelling, wash the area immediately with cool water and discontinue the test.
- The 48-Hour Check: After the initial 24 hours, rinse the area. Observe the skin closely for any signs of redness, bumps, or allergic reaction. However, do not stop there. Many reactions are delayed, so it is best to continue monitoring the spot for another 24 to 48 hours.
- Repeat for Cumulative Effects: Some ingredients only cause issues after repeated exposure. For the most thorough results, especially with “active” ingredients like AHAs or retinoids, you may want to repeat the application on the same spot once a day for up to a week.
Tips for Best Results
To get the most out of your patch testing, consistency is key. Always try to test only one new ingredient at a time. If you apply a brand-new serum containing five different new extracts and your skin reacts, you will have no way of knowing which specific component caused the issue. By isolating each ingredient, you can build a safe “library” of components that you know your skin loves. This methodical approach is the hallmark of a truly professional-minded home formulator.
Another tip is to consider the environmental factors during your test. For example, if you are testing a new moisturiser during a period of extreme heat or humidity, your skin’s barrier might be more reactive than usual. Similarly, try to avoid starting a patch test if your skin is already compromised, such as after a professional peel or when you have a sunburn. You want to test the ingredient on your skin in its most “normal” state to get an accurate baseline of how it will perform in your daily routine.
Documentation is also incredibly helpful. It might seem tedious to write down your findings, but after testing dozens of oils and extracts, it is easy to forget which ones caused a slight tingle and which ones were perfectly soothing. Keeping a simple log in your formulation notebook allows you to track patterns over time. You might discover, for instance, that your skin consistently reacts to certain botanical families, which can guide your future ingredient purchases and recipe developments.
Safety and Patch Testing
While patch testing is a vital safety measure, it is not a 100% guarantee that you won’t have a reaction when you apply the product more broadly. However, it significantly reduces the risk of a severe allergic reaction. Always remember that if you have a history of severe allergies or skin conditions like eczema or rosacea, it is a good idea to consult with a dermatologist before experimenting with potent DIY ingredients. Safety should always be your number one priority; no “miracle” ingredient is worth compromising the health and integrity of your skin’s natural barrier.
Frequently Asked Questions
Q: How long should I really wait before deciding an ingredient is safe?
A: While 24 hours is the minimum for most tests, we strongly recommend waiting 48 to 72 hours. Some allergic reactions, known as delayed hypersensitivity, can take a few days to fully manifest. If you are particularly sensitive, monitoring the area for up to a week is the safest approach.
Q: Can I patch test multiple ingredients at once?
A: It is best to test only one new ingredient at a time on different areas of the body. If you test multiple things in the same area, cross-contamination can occur, making it impossible to tell which ingredient caused a reaction. If you must test multiple items, use clearly separated spots like one on each arm and one behind each ear.
Q: What should I do if I have a bad reaction during a patch test?
A: If you experience immediate burning, stinging, or visible swelling, wash the area immediately with plenty of cool water and a mild, soap-free cleanser. You can apply a cold compress to soothe the area. If the reaction is severe or does not subside within a day, seek advice from a medical professional or pharmacist.
Conclusion
Mastering the art of how to patch test skincare is an essential rite of passage for anyone serious about DIY beauty. It may require a bit of extra time and a dose of patience, but the protection it offers your skin is well worth the effort. By following a consistent testing protocol, you can explore the world of natural ingredients with confidence, knowing that you are making informed choices for your unique complexion. Now that you know the right way to test, why not pick up that new botanical oil you’ve been eyeing and start your first safe patch test today? Your skin will certainly thank you for the extra care and attention.
You May Also Like