Have you ever found yourself constantly reapplying lip balm, only to feel like your lips are getting drier by the minute? It is a common frustration for many, and the culprit often lies within the very products designed to help. Transitioning to a DIY natural lip balm is one of the most rewarding and beginner-friendly projects you can undertake in your home formulation journey. Not only do you gain complete control over the ingredients, but you also ensure that every swipe delivers genuine nourishment to your delicate skin. In this guide, we will explore why making your own lip care is a game-changer and provide you with foolproof recipes to get started.
The Problem with Commercial Lip Balms
Many mass-produced lip balms rely on petroleum-based ingredients like petrolatum, mineral oil, or paraffin wax. While these substances are excellent at creating a physical barrier that traps moisture, they do not actually provide any nutritive benefits to the skin. They are essentially inert fillers that sit on the surface. Over time, relying solely on these occlusives without added humectants or emollients can leave your lips feeling parched as soon as the product wears off. This is often referred to as the “lip balm addiction” cycle, where the more you apply, the more you feel you need it.
Furthermore, synthetic fragrances and “cooling” agents like menthol, phenol, or camphor can be incredibly irritating to the thin skin on our lips. These ingredients create a tingling sensation that many associate with “working,” but in reality, they can cause micro-inflammation and accelerate dryness. Synthetic dyes and preservatives can also be hidden sources of allergens for those with sensitive skin. By choosing a DIY natural lip balm, you bypass these synthetic fillers and irritants entirely. Instead, you harness the power of plant-based waxes, rich nut butters, and botanical oils that work in harmony with your body’s natural processes.
Understanding Lip Anatomy and Why It Needs Special Care
The skin on our lips is significantly different from the skin on the rest of our body. It is much thinner, containing only three to five cellular layers compared to the sixteen layers found elsewhere. Crucially, the lips lack sebaceous glands, which are responsible for producing the natural oils that keep skin hydrated and protected. This makes the lips uniquely vulnerable to environmental stressors like wind, cold air, and UV radiation. Without a natural oil barrier, moisture evaporates from the lips much faster than from other areas, a process known as trans-epidermal water loss (TEWL).
When you create a DIY natural lip balm, you are essentially formulating a replacement for those missing natural oils. A well-crafted balm provides three essential functions: hydration (humectancy), softening (emolliency), and protection (occlusion). By selecting specific natural ingredients, we can address each of these needs simultaneously, ensuring that your lips remain soft, supple, and healthy throughout the year.
Essential Ingredients for a DIY Natural Lip Balm
Creating a high-quality lip balm is all about finding the perfect balance between hardness, glide, and skin-feel. Here is a detailed look at the key components you will need for a professional-grade finish:
The Structural Elements: Waxes
Waxes provide the structure and “staying power” of your balm. They ensure the product remains solid in the tube but melts slightly upon contact with the warmth of your lips. Beeswax is the traditional choice for a DIY natural lip balm. It offers a subtle, sweet honey scent and creates a breathable protective barrier that locks in moisture while allowing the skin to function normally. It is also naturally antibacterial and anti-inflammatory, making it excellent for healing chapped skin.
For those seeking a vegan alternative, carnauba wax is a fantastic option. Carnauba, derived from the leaves of the Brazilian palm tree, is exceptionally hard and provides a high-gloss finish. It requires careful ratio adjustments to achieve the right texture. You can learn more about [different cosmetic waxes](INTERNAL_LINK) to understand how they affect the final feel of your products.
The Nourishing Core: Butters and Oils
- Shea Butter: This creamy butter is a powerhouse of vitamins A and E. It is deeply emollient, meaning it fills in the tiny cracks in dry skin to create a smooth surface. Shea butter also contains cinnamic acid, which provides a very mild natural sun protection factor (SPF).
- Jojoba Oil: Technically a liquid wax, jojoba oil closely mimics the natural sebum produced by our skin. It is highly biocompatible and absorbs quickly without leaving a greasy residue, making it an ideal carrier oil for lip care.
- Castor Oil: Known for its incredible viscosity, castor oil provides a wonderful “slip” and a natural glossy shine. It is also a humectant, meaning it helps to draw moisture into the skin.
- Vitamin E: This is a non-negotiable addition. While it provides antioxidant benefits for the lips, its primary role is to protect the delicate carrier oils from oxidation, extending the shelf life of your DIY natural lip balm.
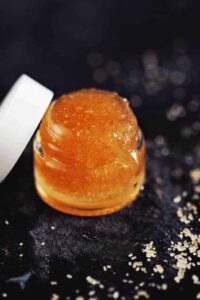
Classic Beeswax DIY Natural Lip Balm Recipe
This recipe creates a firm yet creamy balm that stays on the lips through talking and drinking. It is designed to be poured into standard 5ml lip balm tubes or small tins. The ratios are balanced to ensure the balm does not melt in your pocket but remains easy to apply.
Ingredients (Makes approx. 10 tubes)
| Ingredient | Amount (Grams) | Percentage (%) |
|---|---|---|
| Beeswax Pellets | 15g | 25% |
| Shea Butter | 15g | 25% |
| Jojoba Oil | 18g | 30% |
| Castor Oil | 9g | 15% |
| Vitamin E Oil | 1.5g | 2.5% |
| Essential Oil (e.g., Peppermint) | 1.5g (approx. 30 drops) | 2.5% |
Step-by-Step Instructions
- Sanitise Your Workspace: Before you begin, ensure all your equipment, including the double boiler, stirring rod, and containers, is thoroughly cleaned and disinfected with 70% isopropyl alcohol.
- Set Up a Double Boiler: Fill a small saucepan with about 2 inches of water and bring it to a gentle simmer. Place a heat-proof glass jug or a stainless steel bowl over the pan, ensuring the bottom does not touch the water.
- Melt the Hard Ingredients: Add the beeswax pellets and shea butter to your double boiler. Stir gently and frequently until the mixture has completely liquefied. Keep the heat as low as possible to avoid scorching the butter.
- Incorporate the Liquid Oils: Once the wax and butter are melted, pour in the jojoba oil and castor oil. Continue to stir for another minute or two until the entire mixture is uniform, clear, and free of any “streaks.”
- Cool and Scent: Remove the mixture from the heat. Allow it to cool for about 45 to 60 seconds. Stir in the Vitamin E and your chosen essential oils. This timing is crucial as it prevents the heat from evaporating the volatile aromatic compounds in the essential oils.
- The Precision Pour: Carefully pour the liquid into your lip balm tubes or tins. Fill them slightly above the rim, as the mixture will shrink slightly as it cools, creating a small dip in the centre.
- Set and Cure: Let the balms sit undisturbed at room temperature for at least 3 to 4 hours. For the absolute best results, wait a full 24 hours before capping and using them.
Going Vegan: Using Carnauba Wax Alternative
If you prefer a plant-based lifestyle, you can easily adapt this DIY natural lip balm by substituting beeswax with carnauba wax. Carnauba is often called the “Queen of Waxes” and is prized for its durability and high melting point. However, because it is significantly harder than beeswax, a direct 1:1 substitution will result in a balm that is too hard to use.
For a successful vegan version, use 12g of carnauba wax and increase the jojoba oil to 21g. This adjustment maintains the structural integrity of the balm while ensuring it still glides smoothly across the lips. You can find more detailed guides on [vegan skincare formulating](INTERNAL_LINK) to help you master these plant-based textures.
Customising Your Natural Flavour and Scent
One of the joys of making your own lip care is the ability to customise the scent and flavour to your exact preference. While many commercial “flavour oils” are synthetic, you can achieve a beautiful, subtle aroma using high-quality, food-grade essential oils. Always ensure you are using skin-safe essential oils at a safe dilution rate (typically 1% or less for lip products).
- Refreshing Peppermint: Use Peppermint essential oil for a classic cooling sensation. It is also great for stimulating circulation in the lips.
- Citrus Dream: Sweet Orange or Mandarin oils provide a bright, cheerful scent that everyone loves.
- Soothing Lavender: A tiny drop of Lavender can be incredibly calming, especially if your lips are sore or wind-burned.
It is important to remember that some citrus oils, such as cold-pressed Lemon or Lime, are phototoxic. Always opt for steam-distilled citrus oils or Sweet Orange oil, which is generally considered safe for leave-on products. You might also consider [infusing oils with herbs](INTERNAL_LINK) like calendula for added therapeutic benefits and a natural tint of colour.
Pro Tips for a Professional Finish
To achieve a professional look and feel for your DIY natural lip balm, keep these advanced tips in mind:
- The “Spoon Test”: Before pouring your entire batch, dip a cold metal spoon into the melted mixture and let it set for a minute. This allows you to test the final hardness and “payoff” on your skin. If it is too hard, add a teaspoon more oil. If it is too soft, add a few more wax pellets.
- Avoid the “Grainy” Texture: Shea butter is notorious for becoming grainy if it cools too slowly. To prevent this, ensure you melt the butter thoroughly and consider placing your filled tubes in the refrigerator for the first 20 minutes of cooling to “flash set” the mixture.
- Preventing the “Sink Hole”: As lip balm cools, it contracts. To avoid a large hole in the middle of your tube, do a “double pour.” Fill the tubes 90% of the way, let them set for 10 minutes, and then top them off with the remaining warm mixture.
Shelf Life and Proper Storage
Since this recipe does not contain water, it is not susceptible to microbial growth. However, the oils and butters themselves can eventually go rancid through oxidation. Your DIY natural lip balm should typically last between 9 to 12 months, provided you have used fresh ingredients and added Vitamin E. To maximise longevity, store your balms in a cool, dry place away from direct sunlight and extreme heat. If you notice a change in the smell or a significant change in texture, it is time to discard it and whip up a fresh batch.
Making your own lip care is a small but powerful step toward a more sustainable and health-conscious lifestyle. It leads to a much larger understanding of the chemistry of what goes onto your skin and empowers you to make informed choices. Once you master this basic recipe, the possibilities for customisation are endless. Enjoy the process of creating something truly nourishing and uniquely yours.
You May Also Like