DIY Lip Balm Recipe: Simple and Nourishing
Have you ever scrutinised the ingredients in your store-bought lip balm and wondered what exactly you’re smearing on your skin? Most commercial lip balms contain a cocktail of synthetic chemicals, artificial fragrances, and preservatives that may do more harm than good. What if you could skip the guesswork and make a DIY lip balm recipe that’s not only nourishing but also completely natural and tailor-made just for you? Today, we’re diving into a simple, effective recipe that uses wholesome ingredients like beeswax, shea butter, and natural oils to pamper your lips the way nature intended.
Why Make Your Own Lip Balm?
Creating your own lip balm offers complete control over what goes on your skin, letting you avoid irritants, allergens, and hidden nasties. Plus, it’s cost-effective, fun, and a fantastic way to explore DIY skincare. Whether you prefer a subtle tint, a hint of flavour, or a completely unscented balm, this recipe is easy to customise for all preferences and skin types.
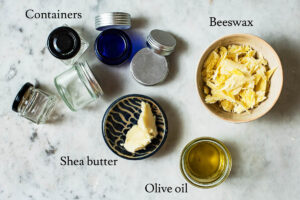
Ingredients for Your DIY Lip Balm
This recipe makes approximately 30g of lip balm, enough for several small containers or tubes. The percentages are based on the total weight to help you scale up or down easily.
- Beeswax (30%) – 9g: The foundation of your balm, beeswax provides structure, locks in moisture, and adds a subtle natural scent.
- Shea Butter (25%) – 7.5g: Rich in vitamins A and E, shea butter deeply nourishes and soothes dry, chapped lips.
- Coconut Oil (25%) – 7.5g: Adds hydration and a smooth glide, plus antimicrobial properties.
- Sweet Almond Oil (15%) – 4.5g: A gentle, nourishing oil rich in fatty acids to maintain soft lips.
- serum-scars/”>Vitamin E Oil (5%) – 1.5g: Acts as a natural preservative and antioxidant, extending shelf life and protecting skin.
- Essential Oils (optional) – 0.5-1%: For fragrance and therapeutic benefits. Popular choices include peppermint, lavender, or orange. Use sparingly.
Step-by-Step Method to Make Your Lip Balm
- Prepare your workspace: Clean and sterilise all equipment and containers with boiling water or isopropyl alcohol to prevent contamination.
- Measure the ingredients accurately: Use a digital scale for precision to ensure the right texture and consistency.
- Melt the beeswax, shea butter, and coconut oil: Combine these in a heatproof glass bowl or double boiler. Gently heat over simmering water, stirring occasionally until fully melted.
- Add the sweet almond oil: Stir it in once the mixture has melted and is smooth.
- Remove from heat: Allow the mixture to cool slightly but not solidify.
- Incorporate the vitamin E oil and essential oils: Stir in well to distribute evenly.
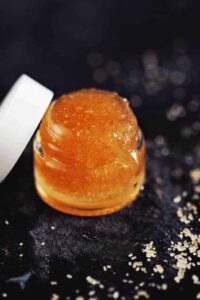
- Pour into containers: Transfer the warm liquid into lip balm tins or tubes. Work quickly before it starts to set.
- Let it set: Leave the containers at room temperature for 2-3 hours or refrigerate for faster solidification.
- Label and store: Once solid, seal your containers and label them with the date.
Customisation Tips
- For a tinted balm: Add a small pinch of natural colourants like beetroot powder, mica powder, or cocoa powder.
- For a glossier finish: Increase the proportion of oils slightly, but be careful not to make it too soft.
- For extra moisturisation: Add a teaspoon of honey or glycerine, but note this may reduce shelf life.
Safety Precautions and Storage Guidelines
While this DIY lip balm recipe uses safe, natural ingredients, it’s important to consider a few safety points:
- Patch test essential oils before use to avoid allergic reactions. Some oils can irritate sensitive skin.
- Use food-grade or cosmetic-grade ingredients to ensure safety for your lips.
- Store in a cool, dry place away from direct sunlight to prevent melting and oxidation.
- Keep containers tightly closed to avoid contamination and moisture ingress.
- Shelf life: Your DIY lip balm will last approximately 6-12 months. Vitamin E oil helps slow rancidity but always check for off smells or changes in texture before use.
Frequently Asked Questions about DIY Lip Balm
Can I substitute beeswax with a vegan alternative?
Yes, you can replace beeswax with candelilla wax or carnauba wax for a vegan-friendly option. These waxes have different melting points and textures, so you may need to adjust quantities to achieve the desired firmness.
How do I prevent my lip balm from feeling greasy?
Balance is key. Using too much oil can make your balm greasy. Stick to the recommended ratios and include adequate beeswax to provide structure and reduce oiliness.
Is it safe to add flavour oils or extracts?
Yes, but only use oils or extracts specifically labelled safe for lip products or ingestion, and use them sparingly. Avoid synthetic flavourings that may irritate sensitive skin.
Can I make lip balm in larger batches to sell?
Absolutely! Just scale the ingredients proportionally and ensure strict hygiene and labelling according to local cosmetic regulations. Adding natural preservatives like vitamin E is advisable for extended shelf life.
What containers work best for lip balms?
Small tins with screw lids or twist-up lip balm tubes are popular. Glass jars are also fine but less portable. Choose containers that seal well to protect your balm.
Final Thoughts on Making Your Own Lip Balm
There’s something deeply satisfying about creating your own skincare products from scratch, especially a staple like lip balm that you use daily. This DIY lip balm recipe is a perfect starting point: simple, nourishing, and endlessly adaptable. By choosing quality natural ingredients and customising your balm to suit your preferences, you’re not only caring for your lips but also taking a mindful step towards cleaner, greener beauty routines.
Embrace the joy of DIY skincare and discover how easy and rewarding it is to craft your own lip care essentials. Your lips will thank you for it.
You May Also Like