How to Make Your Own Zero-Waste Facial Cleanser
The beauty industry is notorious for its plastic waste, with millions of bottles ending up in landfills every year. If you’re looking to reduce your environmental footprint without compromising your skincare routine, learning how to make a zero waste facial cleanser DIY is a fantastic place to start. Not only is it a sustainable choice, but it also allows you to control every single ingredient that touches your skin, ensuring a gentle and effective cleanse every time.
Creating your own zero waste facial cleanser DIY at home is surprisingly simple and cost-effective. By using high-quality, natural ingredients and reusable glass packaging, you can transition to a more eco-friendly beauty regimen that benefits both your complexion and the planet. In this guide, we’ll walk you through everything you need to know to formulate a cleanser that’s tailored to your skin’s unique needs, all while keeping your bathroom cabinet plastic-free.
What Is a Zero-Waste Facial Cleanser?
A zero-waste facial cleanser is a skincare product designed with sustainability at its core. Unlike traditional cleansers that often come in single-use plastic bottles and contain synthetic microplastics or harsh chemical surfactants, a zero waste facial cleanser DIY focuses on biodegradable ingredients and reusable or recyclable packaging. The goal is to create a product that leaves no trace on the environment once it’s been used.
In the world of DIY skincare, this typically means using a combination of natural soaps, carrier oils, and distilled water stored in a glass pump or dropper bottle. By choosing ingredients like liquid castile soap and plant-based oils, you’re not only avoiding the plastic waste associated with commercial products but also reducing the chemical runoff that can harm aquatic life. It’s a holistic approach to beauty that prioritises the health of our ecosystems as much as the health of our skin.
Benefits of Zero-Waste Facial Cleanser for Skin
Switching to a zero waste facial cleanser DIY offers several significant benefits for your skin, beyond the obvious environmental advantages. Here are some of the key reasons why home-formulated cleansers are a superior choice for your daily routine:
- Gentle and Non-Stripping: Many commercial cleansers use harsh sulfates (like SLS) to create foam, which can strip the skin of its natural oils and lead to dryness or irritation. A DIY version using liquid castile soap is much gentler, maintaining your skin’s natural moisture barrier.
- Fully Customisable: Whether you have oily, dry, or sensitive skin, you can adjust the ratios of your zero waste facial cleanser DIY to suit your needs. For example, adding more jojoba oil can provide extra nourishment for dry skin, while tea tree oil can help manage breakouts for oily types.
- Free from Synthetic Fragrances: Synthetic fragrances are a common cause of skin sensitivity and allergic reactions. By making your own cleanser, you can use high-quality essential oils for a natural scent or leave it completely fragrance-free.
- Rich in Nutrients: When you formulate your own cleanser, you can include nutrient-dense ingredients like vitamin E oil or vegetable glycerin, which help to hydrate and protect the skin during the cleansing process.
- Cost-Effective Sustainability: Buying ingredients in bulk and reusing your glass bottles makes this a much more affordable option in the long run. You’re paying for the high-quality ingredients themselves, not the expensive marketing and plastic packaging.
What You Need
To get started with your zero waste facial cleanser DIY, you’ll need a few basic ingredients and some simple equipment. Most of these can be purchased in bulk or in glass packaging to stay true to the zero-waste philosophy.
- 1/4 cup Liquid Castile Soap (unscented is best for customisation)
- 1/4 cup Distilled Water (essential for preventing microbial growth)
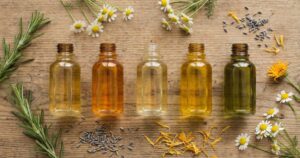
- 1 tablespoon Carrier Oil (such as Jojoba, Sweet Almond, or Fractionated Coconut Oil)
- 1 teaspoon Vegetable Glycerin (optional, for added hydration)
- 5-10 drops Essential Oil (optional; Lavender for calming, Tea Tree for acne-prone skin)
- A reusable 100ml glass pump bottle
- A small funnel (to make pouring easier)
Step-by-Step Recipe: How to Do It
Follow these simple steps to create your own sustainable, zero waste facial cleanser DIY. This recipe makes approximately 120ml of cleanser, which should last you several weeks of daily use.
- Sterilise Your Equipment: Before you begin, ensure your glass bottle and funnel are thoroughly cleaned and sterilised. You can do this by washing them in hot soapy water and then rinsing with boiling water or a quick wipe with isopropyl alcohol.
- Combine Water and Soap: Using your funnel, pour the distilled water into the glass bottle first, followed by the liquid castile soap. Adding the water first helps to prevent the soap from foaming up too much as you mix.
- Add the Carrier Oil: Carefully pour in your chosen carrier oil. If you have oily skin, jojoba oil is a great choice as it closely mimics the skin’s natural sebum. For drier skin, sweet almond oil offers deeper nourishment.
- Incorporate the Glycerin and Essential Oils: Add the vegetable glycerin if you’re using it, followed by your drops of essential oil. Be careful not to exceed 10 drops, as essential oils are highly concentrated and can cause irritation if overused.
- Shake Gently: Secure the pump lid on your bottle and give it a gentle shake to combine all the ingredients. You’ll notice the mixture might look a bit cloudy or separate over time—this is perfectly normal for a natural product without synthetic emulsifiers.
- Label and Store: Use a paper label or a chalk marker to date your cleanser. Store it in a cool, dry place away from direct sunlight to preserve the integrity of the oils.
Tips for Best Results
To get the most out of your zero waste facial cleanser DIY, keep these practical tips in mind:
- The “Shake Before Use” Rule: Because this recipe doesn’t contain synthetic stabilisers, the oil and water components will naturally separate. Always give the bottle a quick shake before each use to ensure you’re getting an even blend of ingredients.
- Adjust for the Seasons: Your skin’s needs change throughout the year. In the winter, you might want to increase the amount of carrier oil for extra protection against the cold. In the summer, you can reduce the oil for a lighter, more refreshing cleanse.
- Double Cleansing: If you wear heavy makeup or sunscreen, consider using a plain carrier oil (like jojoba) first to break down the products, followed by your zero waste facial cleanser DIY for a deep, thorough clean.
- Quality Matters: The effectiveness of your cleanser depends on the quality of your ingredients. Look for organic, cold-pressed oils and pure, therapeutic-grade essential oils whenever possible.
Safety and Patch Testing
Even though this zero waste facial cleanser DIY uses natural ingredients, it’s still important to prioritise safety. Essential oils and even some carrier oils can cause reactions in sensitive individuals. Before using your new cleanser on your entire face, perform a patch test by applying a small amount to the inside of your wrist or behind your ear. Wait 24 hours to ensure no redness, itching, or irritation occurs.
Additionally, because this recipe contains water, it is susceptible to bacterial growth over time. Always use distilled water (not tap water) and ensure your hands are clean before using the pump. If you notice any change in smell, colour, or consistency, discard the batch and make a fresh one. For an extra layer of protection, you can add a natural preservative like Leucidal Liquid if you plan on keeping the cleanser for longer than a month.
Frequently Asked Questions
How long will my DIY zero-waste cleanser last?
When made with distilled water and stored in a cool, dark place, your zero waste facial cleanser DIY should remain fresh for about 4 to 6 weeks. Using a glass pump bottle helps to minimise contamination from your hands, which can extend its shelf life. If you want it to last longer, consider making smaller batches more frequently or adding a natural preservative.
Can I use this cleanser to remove waterproof makeup?
While this cleanser is effective for daily dirt and light makeup, it may struggle with heavy waterproof mascara or long-wear foundation. For the best results, we recommend using the “oil cleansing method” first with a bit of pure jojoba or almond oil to dissolve the makeup, then following up with your zero waste facial cleanser DIY to wash away the residue.
Is castile soap safe for all skin types?
Liquid castile soap is a natural, vegetable-based soap that is generally safe for most skin types. However, it does have a slightly alkaline pH. By diluting it with distilled water and adding nourishing carrier oils, we help to balance the formula. If you have extremely sensitive or very dry skin, you may want to increase the oil-to-soap ratio to make it even more moisturising.
Conclusion
Embracing a more sustainable beauty routine doesn’t have to be complicated or expensive. By mastering the art of the zero waste facial cleanser DIY, you’re taking a significant step towards reducing your environmental impact while giving your skin the high-quality, natural care it deserves. This simple recipe is just the beginning of your journey into the world of eco-friendly, home-formulated skincare. Give it a try this weekend, and experience the satisfaction of a glowing complexion that’s as kind to the planet as it is to your face!
Ready to dive deeper into sustainable beauty? Check out our other guides on and to continue building your eco-friendly skincare kit today.
You May Also Like