DIY Azelaic Acid Cream for Rosacea and Acne Marks
Dealing with the double whammy of persistent redness and stubborn post-acne marks can feel like an uphill battle for your skin. If you have sensitive skin that reacts to everything or rosacea that flares up at the slightest hint of stress, you know how hard it is to find a product that actually works without causing further irritation. That is where a DIY azelaic acid cream rosacea focused formula comes into play, offering a gentle yet incredibly effective solution for those of us who prefer to take a hands-on approach to our skincare routine. By creating your own formulation, you ensure that every ingredient serves a purpose, cutting out the unnecessary fragrances and fillers that often plague commercial products.
Azelaic acid is often the unsung hero of the skincare world, sitting quietly in the shadow of flashier ingredients like retinol or vitamin C. However, for anyone struggling with inflammatory skin conditions or uneven tone, it is an absolute game-changer. By making your own DIY azelaic acid cream rosacea treatment, you can control the concentration, ensure the ingredients are fresh, and avoid the common triggers that often cause sensitivity in those with reactive skin. In this guide, we will walk through everything you need to know to formulate a professional-quality cream right in your own kitchen, using simple tools and accessible ingredients that deliver real results.
What Is Azelaic Acid?
Azelaic acid is a naturally occurring dicarboxylic acid found in grains like barley, wheat, and rye, though the version we use in skincare is typically lab-synthesized for stability and purity. Unlike many other acids used in skincare, it is not an alpha-hydroxy acid (AHA) or a beta-hydroxy acid (BHA). Instead, it belongs to its own unique class, which is why it behaves so differently on the skin. It is celebrated for its multi-functional properties: it is antimicrobial, anti-inflammatory, and a mild exfoliant all rolled into one. This makes it particularly suitable for those who find traditional exfoliating acids too harsh or irritating.
For those of us in the DIY community, understanding the chemistry of azelaic acid is key to successful formulation. It works by inhibiting the growth of skin bacteria that cause acne and by keeping pores clear of debris. Furthermore, it is a tyrosinase inhibitor, which means it interferes with the enzyme responsible for producing melanin. This is why it is so effective at fading those pesky dark spots left behind after a breakout. Because it is so gentle, it is often the first choice for dermatologists treating patients with rosacea or extremely sensitive skin who cannot tolerate stronger actives like benzoyl peroxide or high-strength retinoids.
Benefits of Azelaic Acid for Skin
The beauty of azelaic acid lies in its versatility. Whether you are fighting active breakouts or trying to calm a red, angry complexion, this ingredient has something to offer. Here are the primary benefits of incorporating a DIY azelaic acid cream rosacea recipe into your routine:
- Calms Rosacea Redness: Azelaic acid is one of the few ingredients FDA-approved for treating rosacea. It works by reducing the production of pro-inflammatory molecules, effectively “cooling down” the skin and reducing the appearance of visible blood vessels and persistent flushing.
- Fades Post-Inflammatory Hyperpigmentation (PIH): If you are left with dark or red marks after a pimple heals, azelaic acid can help. By targeting overactive melanocytes (pigment-producing cells), it encourages an even skin tone without bleaching the surrounding healthy skin.
- Fights Acne-Causing Bacteria: It has significant antimicrobial properties against Propionibacterium acnes and Staphylococcus epidermidis. Unlike some antibiotics, bacteria do not seem to develop a resistance to azelaic acid, making it a great long-term option for acne management.
- Refines Skin Texture: As a mild exfoliant, it helps to normalize the shedding of dead skin cells. This prevents the “clumping” of cells that leads to clogged pores and a dull, rough complexion, leaving your skin feeling smoother and looking more radiant.
- Antioxidant Support: It helps to neutralise free radicals, which are unstable molecules that can damage skin cells and accelerate the ageing process, providing an extra layer of protection against environmental stressors.
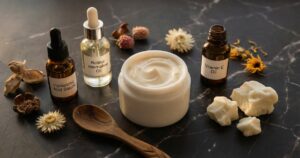
What You Need
To create a stable and effective DIY azelaic acid cream rosacea treatment, you will need a few specific ingredients. While azelaic acid can be tricky to dissolve due to its crystalline structure, using a solvent like Propanediol makes the process much easier for beginners. Here is your shopping list for a 100g batch:
- Azelaic Acid Powder (10g): The star of the show. We will be aiming for a 10% concentration, which is the standard for effective over-the-counter treatments.
- Propanediol (20ml): This acts as our primary solvent. Azelaic acid has very poor solubility in water, so we need Propanediol to dissolve the powder and ensure the final cream doesn’t feel “gritty” on your skin.
- Base Cream or Lotion (70g): Use a simple, fragrance-free, and non-comedogenic base cream. Look for one that contains soothing ingredients like glycerine, ceramides, or colloidal oatmeal.
- Distilled Water (Optional, 5ml): Only needed if your base cream is exceptionally thick and you want to achieve a lighter, more spreadable consistency.
- Digital Scale: Accuracy is vital in cosmetic formulation. A scale that measures to 0.01g is ideal for getting the percentages exactly right.
- Glass Beakers and Stirring Rod: For mixing your ingredients hygienically and allowing for easy heat transfer if needed.
- pH Strips: To ensure your final product is in the skin-friendly range of 4.5 to 5.5, which is where azelaic acid is most stable and effective.
Step-by-Step Recipe: How to Make Your DIY Azelaic Acid Cream
Creating your own DIY azelaic acid cream rosacea formula is a straightforward process, but it requires patience to ensure the powder is fully dissolved. Follow these steps for a smooth, professional-grade result:
- Sanitise Everything: Before you begin, thoroughly clean your workspace and sanitise all your equipment with 70% isopropyl alcohol. This prevents any bacterial contamination in your cream and ensures a longer shelf life.
- Weigh Your Ingredients: Using your digital scale, carefully weigh out 10g of azelaic acid powder and 20g (approx. 20ml) of Propanediol into a small glass beaker. Precision at this stage is crucial for the effectiveness of the final product.
- Dissolve the Powder: Stir the azelaic acid and Propanediol mixture continuously. You may need to place the beaker in a warm water bath (not boiling) to help the crystals dissolve completely. Stir until the liquid is clear and no longer feels gritty when rubbed between gloved fingers.
- Prepare the Base: In a separate, larger beaker, weigh out 70g of your chosen base cream. If you find the base too thick, you can stir in a small amount of distilled water at this stage until you reach your desired texture.
- Combine the Mixtures: Slowly pour your dissolved azelaic acid solution into the base cream. Stir vigorously for several minutes to ensure the active ingredient is evenly distributed throughout the cream. You want a completely homogeneous mixture.
- Check the pH: Use a pH strip to test your cream. It should ideally fall between 4.5 and 5.5. If it is too low, you can add a tiny drop of a diluted baking soda solution; if it is too high, a tiny drop of citric acid solution will bring it back into the safe range.
- Package and Label: Transfer your finished cream into a clean, airtight jar. Label it with the date of manufacture and the concentration (10% Azelaic Acid). Store it in a cool, dark place away from direct sunlight.
Tips for Best Results
Getting the most out of your DIY azelaic acid cream rosacea treatment involves more than just the recipe. Here are a few expert tips to ensure your skin reaps all the rewards of your hard work:
- Consistency is Key: Azelaic acid is a marathon runner, not a sprinter. While you might see some immediate calming of redness, the real magic happens after 4 to 6 weeks of consistent daily use. Don’t give up too early; your skin needs time to adjust and heal.
- Layer Wisely: Apply your azelaic acid cream after your water-based serums but before your heavier oils or occlusive sunscreens. If your skin is particularly sensitive, you can apply it over your moisturiser initially to buffer the effects and reduce potential tingling.
- Watch the Grittiness: If your cream feels sandy or rough, it means the azelaic acid didn’t fully dissolve. Next time, try increasing the amount of Propanediol slightly or spending more time in the warm water bath during the dissolution phase. A smooth texture is essential for even application.
- Sun Protection is Non-Negotiable: Even though azelaic acid is gentler than other acids, it still encourages skin cell turnover. Always follow up with a broad-spectrum sunscreen during the day to protect your skin and prevent further pigmentation or rosacea flare-ups.
- Start Slow: If you are new to actives, start by applying the cream once every other day. Once your skin has built up a tolerance, you can move to daily or even twice-daily application if your skin handles it well.
Safety and Patch Testing
While azelaic acid is generally very safe and well-tolerated, everyone’s skin is unique. Before applying your new DIY azelaic acid cream rosacea formula to your entire face, you MUST perform a patch test. Apply a small amount of the cream to the inside of your forearm or behind your ear. Wait 24 hours to check for any signs of redness, itching, or burning. A slight tingling sensation upon application is normal, especially during the first few uses, but if you experience intense stinging or a persistent rash, discontinue use immediately. Always consult with a dermatologist if you have severe rosacea or cystic acne before starting a new home treatment.
Frequently Asked Questions
Q: Can I use azelaic acid with Vitamin C or Retinol?
A: Yes! One of the best things about azelaic acid is that it “plays well” with other actives. It can actually help soothe the irritation often caused by retinol. However, if you have very sensitive skin, it is often best to introduce them on separate nights or use one in the morning and the other in the evening to avoid overwhelming your skin barrier.
Q: How long will my DIY cream last?
A: Since you are using a pre-made base cream that already contains a professional preservative system, your DIY version should last for about 2 to 3 months. However, if you notice any change in colour, smell, or texture, it is best to discard it and make a fresh batch to ensure safety and efficacy.
Q: Is azelaic acid safe to use during pregnancy?
A: Azelaic acid is generally considered one of the few acne and rosacea treatments that is safe for use during pregnancy and breastfeeding. It is often the go-to recommendation for hormonal breakouts during this time. However, as with all skincare changes during pregnancy, it is always best to double-check with your healthcare provider first.
Conclusion
Taking control of your skincare by creating a DIY azelaic acid cream rosacea treatment is an empowering way to manage redness and acne marks. By understanding how this incredible ingredient works and following a careful formulation process, you can enjoy a clearer, calmer, and more even complexion without the high price tag of luxury brands. The ability to customise your skincare allows you to focus on what your skin truly needs, leading to better long-term health and radiance. Remember to be patient with your skin and consistent with your application. Ready to see the difference for yourself? Gather your ingredients and start formulating your way to healthier, happier skin today!
You May Also Like