Ingredient sourcing note: Some ingredients mentioned in this article are available from The Skin Science Company (theskinsciencecompany.com.au), an Australian cosmetic raw materials supplier. We recommend them based on the quality and availability of their products. We have no commercial, affiliate, or sponsorship relationship with them and receive no payment or commission for these mentions.
I distinctly remember the moment I fell out of love with the beauty counter.
I was holding a heavy, frosted glass jar of night cream. You know the type—it feels expensive before you even open it. I’d just handed over a not-insignificant amount of money for the promise of “deep hydration” and “restored radiance.”
It felt like a treat. A necessary luxury for my tired skin.
But that evening, out of pure curiosity (and perhaps a bit of boredom), I turned the jar over and squinted at the ingredients list.
The very first word?
Aqua.
Water. Plain old water. And because ingredients are listed in order of quantity, that meant the vast majority of my expensive cream was essentially tap water.
The second ingredient? A silicone to make it feel silky. The third? A stabilizer. By the time I got to the actual active ingredients—the oils and botanical extracts I thought I was paying for—I was nearly at the bottom of the list.
That was the night I decided to stop buying water and start making my own DIY night cream recipe.
The Truth Bomb: Why Your Skin Craves “Waterless”
Here is the thing I learned quickly when I started researching waterless skincare benefits: water is cheap, but it’s also high maintenance.
As soon as you add water to a product, you create a breeding ground for bacteria. To stop that water from going mouldy, manufacturers have to add strong preservatives. To get the oil and water to mix, they add emulsifiers. To get the texture right, they add thickeners.
Suddenly, you have a chemical cocktail just to deliver a tiny amount of moisture.
When you switch to a homemade face balm—which is anhydrous (a fancy word for water-free)—you strip all of that away.
You are left with 100% active ingredients. Every single gram of product is there to feed, nourish, and repair your skin barrier. It’s potent, it’s honest, and frankly, it works better than anything I’ve bought in a store.
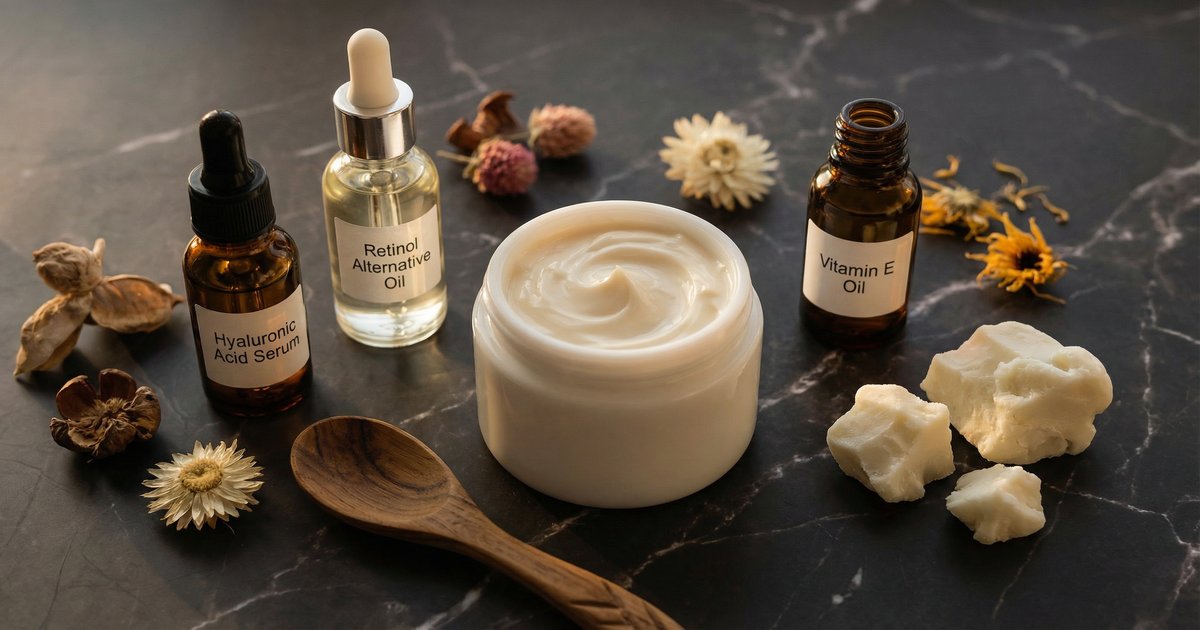
My “Big 4” Ingredients for the Perfect Night Balm
If you are a research nerd like me, you might get overwhelmed trying to determine the best carrier oils for skin types. But for a night cream, you really only need a few key players.
My goal was simple: I wanted something rich enough to last through the night, but absorbable enough that I didn’t stick to my pillowcase. (This is also why I avoid heavier oils that can clog pores—check out my notes on coconut oil for face breakout issues if you have sensitive skin).
Here are the natural night cream ingredients I swear by:
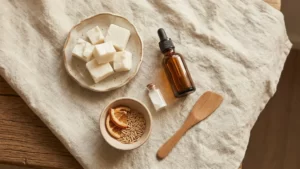
- Raw Shea Butter: This is the workhorse. It’s rich in fatty acids and vitamins A and E. It creates a protective seal over your skin that locks moisture in.
- Jojoba Oil: Technically a liquid wax, Jojoba mimics our skin’s natural sebum. This means it penetrates deep and drags the other nutrients down with it.
- Rosehip Oil: The anti-ageing hero. It’s packed with antioxidants and helps with skin tone and texture.
- Vitamin E Oil: This doubles as an antioxidant for your skin and helps prolong the shelf life of your oils.
The “Sleep Tight” DIY Night Cream Recipe
This is the exact shea butter face cream recipe I use. It’s incredibly forgiving, so don’t stress if your measurements aren’t laboratory-perfect.
Prep time: 15 minutes
Yields: Approx 100g (enough for 3-4 months)
Ingredients:
- 60g Raw Shea Butter
- 30g Liquid Carrier Oil (I use a 50/50 split of Jojoba and Rosehip)
- 1 tsp Vitamin E Oil
- Optional: 5-10 drops of Lavender Essential Oil (for that spa vibe)
Method:
- Set up a double boiler: Place a glass bowl over a pot of simmering water. Make sure the bottom of the bowl doesn’t touch the water.
- Melt the butter: Add your Shea Butter to the bowl. Let it melt gently. Don’t rush this with high heat—gentle is better to preserve the nutrients.
- Add the oils: Once the butter is liquid, remove it from the heat immediately. Stir in your Jojoba, Rosehip, and Vitamin E oils.
- Cool it down: This is crucial. If you let it cool too slowly, Shea Butter can get grainy. I like to pop my bowl in the fridge for about 10-15 minutes until it starts to look opaque and semi-solid (like soft margarine).
- Whip it (Optional): If you like a fluffy texture, use a hand mixer to whip it for 5 minutes. If you prefer a dense balm, just stir it well.
- Pot it: Spoon your mixture into a clean, amber glass jar.
Insider Tips: How Not to Ruin It
I’ve made plenty of mistakes so you don’t have to. If this is your first time making a homemade face balm, keep these two things in mind.
1. The “Grainy” Texture Issue
If your Shea Butter feels gritty like sand a few days later, it’s because it cooled too slowly. The fatty acids separated and crystallized. It is a common problem, but you can learn how to fix grainy shea butter easily by remelting and “shock cooling” it in the freezer.
2. The Application Trick
Because there is no water in this cream, it is rich. If you apply it to dry skin, it might sit on top and feel greasy.
Apply it to damp skin. After you wash your face, don’t towel dry completely. Massage a pea-sized amount of the balm into your damp skin to lock that hydration in.
Final Thoughts
Making your own skincare isn’t just about saving money (though, let’s be honest, buying bulk Shea Butter is a fraction of the cost of luxury brands).
It’s about control. It’s about knowing exactly what is feeding your skin and stripping away the unnecessary noise.
Every time I open my little amber jar now, I don’t smell “Aqua” and chemicals. I smell raw, earthy ingredients that I chose myself.
If you give this DIY night cream recipe a go, I’d love to hear how it turned out for you. Did you stick to the recipe, or did you get creative with your oils?
You May Also Like

One Comment