DIY Ceramide Moisturiser for Barrier Repair: Why Your Skin Deserves It
Have you ever applied countless creams only to find your skin still feels dry, tight, or irritated? The issue might not be what you’re putting on your skin but what’s missing. Ceramides are the unsung heroes of skin barrier repair, and making your own DIY ceramide moisturiser allows you to control exactly what goes into this essential skin-replenishing product.
Whether you suffer from eczema, sensitive skin, or simply want to boost your skin’s natural defences, this guide will walk you through a simple, effective formulation that restores moisture, strengthens the skin barrier, and keeps irritation at bay. Ready to become your own skincare alchemist? Let’s dive in.
Why Ceramides Matter in Your Skincare Routine
Ceramides are a type of lipid naturally found in the skin’s outer layer. They act like mortar between the bricks (skin cells), sealing in moisture and protecting against environmental aggressors. When ceramide levels drop—due to ageing, harsh weather, or skin conditions like eczema—the barrier becomes compromised, leading to dryness, redness, and sensitivity.
Using a DIY ceramide moisturiser ensures you’re replenishing these vital lipids directly, helping your skin heal and retain hydration effectively. Commercial products often contain ceramides, but making your own means you can avoid unnecessary additives and tailor the formulation specifically to your skin needs.
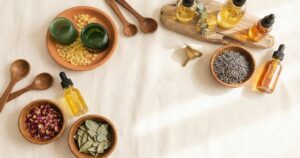
Ingredients for Your DIY Ceramide Moisturiser
This recipe balances skin barrier restoration with gentle moisturisation and soothing botanicals. All percentages are given as weight percentages of the total formula.
- Ceramide Complex (Ceramide NP, AP, EOP blend): 2% — The star active for barrier repair
- Shea Butter: 15% — Deeply nourishing, supports skin elasticity
- Squalane: 10% — Lightweight emollient that mimics skin’s natural oils
- Glycerin: 5% — Humectant to attract moisture
- Hyaluronic Acid (1% solution): 3% — Plumps and hydrates skin
- Oat Extract: 3% — Soothes irritation and inflammation
- Emulsifying Wax (e.g., Polawax): 6% — To blend oil and water phases
- Distilled Water: 55% — Hydration base
- Preservative (e.g., Geogard ECT): 1% — Essential for safety and shelf-life
- serum-scars/”>Vitamin E (Tocopherol): 0.5% — Antioxidant to protect oils and skin
Step-by-Step Method to Make Your DIY Ceramide Moisturiser
- Prepare your workstation: Clean and sanitise all utensils, containers, and your hands to avoid contamination.
- Oil phase: Combine shea butter, squalane, emulsifying wax, and vitamin E in a heat-safe glass container.
- Water phase: In a separate container, mix distilled water, glycerin, oat extract, and hyaluronic acid solution.
- Heat: Warm both containers in a double boiler to 70-75°C until the wax and butter have fully melted.
- Combine phases: Slowly pour the water phase into the oil phase while continuously stirring with a hand blender or whisk.
- Cool and add actives: Allow the mixture to cool to below 40°C, then stir in the ceramide complex and preservative thoroughly.
- Packaging: Transfer your moisturiser into a sterilised jar or pump bottle. Avoid air pockets to maintain product integrity.
- Label: Note the date and ingredients for your records.
Safety Notes and Storage Tips
- Preservative is a must: Since this moisturiser contains water, using a broad-spectrum preservative like Geogard ECT prevents microbial growth and ensures safety.
- Patch test your product: Especially if you have sensitive skin or eczema, test on a small area for 24 hours before full use.
- Storage: Keep your DIY ceramide moisturiser in a cool, dark place to preserve ingredient stability. Avoid direct sunlight and humid environments.
- Shelf life: With proper preservation and storage, expect a shelf life of 3 to 6 months. Discard if you notice changes in texture, smell, or colour.
FAQ About DIY Ceramide Moisturisers
1. Can I use this moisturiser if I have eczema?
Yes, this formulation is designed to support sensitive and eczema-prone skin by restoring the skin barrier and soothing irritation. However, always conduct a patch test and consult your healthcare provider if unsure.
2. Why do I need an emulsifying wax?
Emulsifying wax binds the oil and water phases together, creating a smooth, stable cream. Without it, the ingredients would separate, reducing effectiveness and texture quality.
3. Can I substitute shea butter with another butter?
Shea butter is excellent for skin barrier support, but you can substitute with mango or cocoa butter if preferred. Adjust the percentage slightly as these butters have different melting points and textures.
4. What if I don’t have a ceramide complex?
Ceramides are key for barrier repair, so we recommend sourcing a quality ceramide complex for this recipe. If unavailable, focus on other barrier-supporting ingredients but understand it won’t target ceramide replenishment specifically.
5. How often should I apply this moisturiser?
For best results, apply twice daily, morning and night, after gentle cleansing. Consistency helps rebuild and maintain a healthy skin barrier.
Final Thoughts: Embrace the Power of DIY Skincare
Making your own DIY ceramide moisturiser is not only empowering but also transformative for your skin’s health. By carefully selecting and combining ingredients, you create a product that nourishes deeply, supports barrier repair, and respects your individual skin needs without unnecessary additives.
With just a few simple steps, you can craft a moisturiser that suits your lifestyle and skin type perfectly. Dive into the world of DIY skincare and experience the satisfaction of nurturing your skin with your own hands.
You May Also Like