Discover the Secret to Youthful Skin: Make Your Own DIY Bakuchiol Serum
Retinol has long been hailed as the gold standard in anti-ageing skincare, but its sensitivity and irritation issues leave many seeking a gentler option. What if you could harness similar skin-renewing benefits without the redness, peeling, or sun sensitivity? Enter bakuchiol: nature’s answer to retinol, a plant-derived alternative that’s transforming skincare routines worldwide. Today, we’ll show you how to make a DIY bakuchiol serum that’s effective, soothing, and perfect for all skin types—even sensitive or pregnancy-prone skin.
What is Bakuchiol and Why Choose It?
Bakuchiol is a natural compound extracted from the seeds and leaves of the Psoralea corylifolia plant, traditionally used in Ayurvedic and Chinese medicine. Unlike synthetic retinol, bakuchiol offers antioxidant, anti-inflammatory, and anti-ageing benefits without irritating the skin. It helps reduce fine lines, improves skin texture, and evens out pigmentation while being stable in sunlight—meaning you can use it day or night safely.
Choosing a DIY bakuchiol serum allows you to control ingredient quality, customize potency, and avoid unnecessary fillers or harsh preservatives. Plus, it’s budget-friendly and empowering to create your own skincare at home.
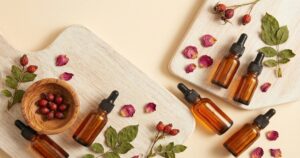
Ingredients for Your DIY Bakuchiol Serum
Below is a simple, yet effective formulation that balances bakuchiol with nourishing oils and skin-loving actives for an anti-ageing powerhouse.
- Bakuchiol oil (1% concentration): 1 ml (1%) – The star ingredient, known for gentle retinol-like effects
- Rosehip seed oil: 7 ml (7%) – Rich in vitamin A and essential fatty acids to support skin regeneration
- Argan oil: 7 ml (7%) – Moisturising and high in antioxidants
- Squalane: 10 ml (10%) – Lightweight hydrator that mimics skin’s natural oils
- Aloe vera gel (100% pure): 70 ml (70%) – Soothing, calming base with hydration benefits
- Vitamin E oil: 2 ml (2%) – Natural antioxidant to preserve the serum and nourish skin
- Preservative (e.g., Leucidal Liquid): 3 ml (3%) – Ensures shelf stability and prevents microbial growth
Total volume: 100 ml
Step-by-Step Method for Your DIY Bakuchiol Serum
- Sanitise your workspace and tools: Clean all equipment, bottles, and surfaces with hot soapy water or isopropyl alcohol to prevent contamination.
- Combine oils: In a clean glass beaker, mix the bakuchiol oil, rosehip seed oil, argan oil, squalane, and vitamin E oil. Stir gently to blend.
- Prepare aloe vera gel: In a separate container, measure out the aloe vera gel. If it’s too thick, gently warm it in a warm water bath to improve mixability.
- Emulsify: Slowly add the oil blend into the aloe vera gel while continuously stirring with a mini whisk or hand blender on low speed. Continue until you achieve a smooth, consistent serum texture.
- Add preservative: Once fully emulsified, stir in your chosen preservative according to manufacturer instructions.
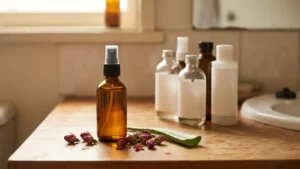
- Transfer: Pour the serum into a dark glass dropper bottle or airless pump container to protect from light and air exposure.
- Label and store: Mark the bottle with the date made and ingredients. Store in a cool, dark place.
Important Safety Notes & Storage Tips
- Patch test: Before applying the serum to your entire face, perform a patch test on a small area of skin to check for any sensitivity or allergic reaction.
- Use sunscreen: Although bakuchiol is not photosensitising like retinol, daily broad-spectrum sunscreen is essential for anti-ageing skincare.
- Shelf life: With preservative, your DIY bakuchiol serum can last 6 to 8 weeks. Without preservative, use within 1 to 2 weeks and keep refrigerated.
- Avoid contamination: Always use clean hands or a dropper to dispense the serum to prevent bacteria from entering the bottle.
- Storage: Keep your serum away from direct sunlight and heat to preserve potency and extend shelf life.
FAQ: Your DIY Bakuchiol Serum Questions Answered
1. Can I use bakuchiol serum during pregnancy?
Yes, bakuchiol is considered safe for pregnancy and breastfeeding as it is a natural alternative to retinol without the associated risks. However, always consult your healthcare provider before introducing new skincare ingredients during pregnancy.
2. How often should I apply DIY bakuchiol serum?
Start by applying the serum once daily, preferably in the evening. If your skin tolerates it well, you can increase to twice daily. Always follow with moisturiser and sunscreen during the day.
3. Can I mix bakuchiol with other active ingredients?
Bakuchiol is gentle and generally compatible with many actives like vitamin C, hyaluronic acid, and niacinamide. However, avoid combining it with strong exfoliating acids (AHAs, BHAs) in the same routine to reduce irritation risk.
4. What skin types benefit most from bakuchiol?
Bakuchiol suits all skin types, including sensitive and acne-prone skin. Its anti-inflammatory properties make it ideal for calming irritation while promoting skin renewal.
5. Is DIY bakuchiol serum better than store-bought options?
DIY formulations give you full control over ingredient quality, concentration, and freshness. While some commercial serums may contain stabilisers and additional actives, making your own allows you to customise and avoid unnecessary fillers or irritants.
Give Your Skin the Gentle Power of Nature with DIY Bakuchiol Serum
Creating your own DIY bakuchiol serum is a rewarding way to embrace natural, effective skincare that respects your skin’s needs. Whether you’re new to DIY formulations or an experienced enthusiast, this simple recipe offers a balanced, gentle alternative to retinol’s often harsh effects. Harness the anti-ageing benefits of bakuchiol alongside nourishing oils and soothing aloe vera to reveal radiant, youthful skin with every drop.
Ready to take your skincare routine into your own hands? Experiment with this recipe, tailor it to your preferences, and join the growing community of DIY skincare lovers discovering the power of botanical actives. Your skin will thank you.
You May Also Like