Have you ever spent hours researching the perfect DIY face cream recipe, carefully sourced the most expensive botanical extracts, and spent an afternoon meticulously formulating, only to find that the final product leaves your skin feeling either incredibly greasy or uncomfortably tight? It is a frustrating experience that almost every home formulator has faced at some point. The truth is, the most advanced active ingredients in the world won’t do much for your complexion if they aren’t suited to your specific biological needs. The foundation of effective skincare—whether you are buying it off the shelf or crafting it in your kitchen—starts with one essential piece of knowledge: your skin type.
Understanding your skin’s unique characteristics is the “secret sauce” that separates amateur DIYers from expert formulators. When you know how to identify skin type at home, you gain the power to customise every serum, lotion, and balm to work in harmony with your body’s natural processes. In this comprehensive guide, we are going to break down the science of skin types, explore the best methods for testing your complexion accurately without a dermatologist, and show you how this knowledge will transform your DIY skincare results. Whether you are a complete beginner or a seasoned hobbyist, getting back to these basics is the best way to ensure your skin gets exactly what it needs to thrive.
What Is Skin Type?
In the world of skincare formulation, your “skin type” refers to the natural physiological state of your skin, primarily determined by how much oil (sebum) your sebaceous glands produce and how well your skin retains moisture. While many people confuse skin type with skin concerns—like acne, ageing, or pigmentation—it is important to distinguish between the two. Your skin type is largely genetic and remains relatively constant throughout your adult life, although it can shift slightly due to hormonal changes or significant ageing. Understanding your base type is the first step in creating DIY products that actually work, as a moisturiser designed for dry skin will likely cause breakouts on someone with an oily skin type.
Most dermatologists and skincare experts categorise skin into five primary groups: oily, dry, combination, sensitive, and normal (or balanced). Oily skin is characterised by an overproduction of sebum, often leading to enlarged pores and a persistent shine. Conversely, dry skin lacks the necessary lipids to maintain a healthy moisture barrier, often feeling tight or looking flaky. Combination skin is perhaps the most common, featuring an oily T-zone (forehead, nose, and chin) with drier or normal cheeks. Sensitive skin is easily irritated by external factors, while normal skin is the “Goldilocks” of types—neither too oily nor too dry. Learning how to identify skin type at home allows you to bypass the guesswork and start formulating with precision.
Benefits of Identifying Your Skin Type for Skin
Accurately identifying your skin type is the foundation of any successful skincare journey, especially for those of us who love to craft our own products at home. When you know exactly what your skin needs, you can stop wasting money on ingredients that don’t serve you and start focusing on those that provide real results. Here are the key benefits of knowing your type:
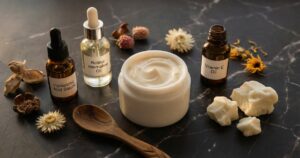
- Targeted Formulation: You can choose specific carrier oils and emulsifiers that match your skin’s lipid profile. For example, oily skin thrives with high-linoleic oils like safflower, which are lightweight and won’t clog pores. On the other hand, dry skin craves the richness of high-oleic oils like avocado to provide deep nourishment.
- Prevention of Irritation: Many “miracle” ingredients can be too harsh if used on the wrong skin type. By knowing you have sensitive skin, you can opt for gentle alternatives like marshmallow root instead of high-strength acids.
- Optimised Hydration: Different skin types require different types of hydration strategies. Dry skin needs a heavy dose of occlusives to lock in moisture, whereas oily skin needs lightweight humectants like hyaluronic acid that hydrate without adding a greasy film.
- Cost Efficiency: No more “trial and error” with expensive raw materials. You’ll know exactly which botanical extracts and actives will provide the most benefit for your specific complexion.
- Improved Skin Health: Using the correct products helps maintain your skin’s acid mantle and barrier function. This leads to a clearer, more radiant, and resilient complexion that looks healthy from the inside out.
What You Need
To accurately perform these tests at home, you don’t need expensive equipment. Most of these items are already in your bathroom or kitchen. Here is what you will need to gather for your skin assessment:
- A Gentle, pH-Balanced Cleanser: Avoid anything with harsh sulphates or exfoliating beads. You want a simple cleanser that cleans without stripping your natural oils.
- A Clean, Soft Cotton Towel: Use a fresh towel to ensure no old product residue interferes with your bare skin.
- Oil-Blotting Papers: You can find these at most pharmacies. Plain un-scented tissue paper can work in a pinch.
- A Mirror in a Well-Lit Room: Natural light is best as it allows you to see the fine texture and any subtle shine or flakiness.
- A Timer: You’ll need to track exactly how long your skin has been “resting” to get an accurate reading.
- A Notebook: Record your observations as you go, especially if you plan to repeat the test.
Step-by-Step Recipe: How to Identify Your Skin Type Accurately at Home
There are two primary ways to check your skin type without professional help: the Bare-Faced Method and the Blotting Paper Test. For the most accurate results, I recommend performing both tests on different days to see if the results are consistent.
Method 1: The Bare-Faced Test
- Cleanse Thoroughly: Start by washing your face with your gentle cleanser to remove all makeup and daily grime.
- Pat Dry: Gently pat your skin dry with your clean towel. Remember to “pat,” not “rub,” to avoid temporary redness.
- The Waiting Game: Leave your skin completely bare. Do not apply any moisturisers or serums. Wait for exactly 60 minutes.
- Observe and Feel: After the hour is up, assess your skin:
- Oily Skin: Does your face look shiny all over? Does it feel “greasy” to the touch?
- Dry Skin: Does your skin feel tight, especially when you smile? Do you see any flaky patches?
- Combination Skin: Is your T-zone (forehead, nose, chin) shiny, while your cheeks feel tight or normal?
- Normal Skin: Does your skin feel comfortable? Not too tight, not too shiny?
- Sensitive Skin: Has your skin become red or itchy just from the act of washing and waiting?
Method 2: The Blotting Paper Test
- Prepare Your Skin: Follow the cleansing steps from the Bare-Faced Method and pat dry.
- Wait 30 Minutes: Allow your sebaceous glands to begin replenishing natural oils.
- Blot Different Zones: Take a fresh blotting paper and press it against your forehead, nose, chin, and both cheeks.
- Examine the Papers: Hold the papers up to a bright light source:
- Oily Skin: Significant oil spots across all papers.
- Dry Skin: Little to no oil visible on any of the papers.
- Combination Skin: Oily T-zone papers but mostly clean cheek papers.
- Normal Skin: A small, even amount of oil across all papers.
Tips for Best Results
- Avoid Extreme Environments: Perform these tests indoors in a temperature-controlled environment.
- Check Your Hormonal Cycle: Hormonal fluctuations can impact oil production, so try to test during a “neutral” time.
- Be Patient: Don’t rush the waiting period; it takes time for natural sebum levels to return to baseline.
- Look at Your Pore Size: Oily types usually have larger pores, while dry types have very small, almost invisible pores.
Safety and Patch Testing
Identifying your skin type is safe, but leaving your skin bare can sometimes cause a flare-up if you have an undiagnosed condition. If your skin becomes painful, rinse with cool water immediately. Once you begin formulating, always perform a patch test on the inside of your elbow for 24 hours before applying any new DIY creation to your face.
Frequently Asked Questions
Can my skin type change over time?
Yes. Factors like ageing, climate changes, and hormonal shifts can cause your skin type to evolve. It is a good idea to re-evaluate how to identify skin type at home at least once a year.
Is “dehydrated skin” a skin type?
No, dehydration is a skin condition. Even oily skin can be dehydrated. Skin type refers to oil production, while dehydration refers to water content.
What if my skin doesn’t fit into just one category?
Most people fall into the “combination” category to some degree. The goal is to find your dominant skin behaviour so you can choose the right base for your DIY recipes.
Conclusion
Taking the time to learn how to identify skin type at home is the single best investment you can make in your DIY skincare journey. By understanding whether your skin is oily, dry, combination, or sensitive, you move from “guessing” to “knowing,” allowing you to select ingredients that harmonise with your unique biology. Now that you have the tools to accurately assess your complexion, why not grab a cleanser and start your test today? Once you’ve found your type, check out our guide on choosing the best carrier oils to start your next formulation project.
You May Also Like