Unlock Radiance: How to Make a DIY Papaya Enzyme Mask That Truly Brightens
Have you ever wondered why your skin feels dull even after exfoliating? The answer might lie in the type of exfoliant you choose. Mechanical scrubs can be harsh, and some chemical peels are too strong for sensitive skin. Enter the DIY papaya enzyme mask, a gentle yet effective solution that uses nature’s own papain enzyme to exfoliate, brighten, and reveal your skin’s natural glow. Ready to discover how to harness this tropical powerhouse? Let’s dive into the science and the steps to formulate your own revitalising treatment at home.
Why Choose a DIY Papaya Enzyme Mask?
Papaya contains an enzyme called papain, a natural proteolytic enzyme that breaks down dead skin cells without the abrasive effects of scrubs. This makes it ideal for all skin types, especially sensitive or acne-prone skin. A DIY papaya enzyme mask offers:
- Gentle exfoliation: Promotes cell turnover and smooth skin texture.
- Brightening effects: Helps fade dullness and uneven skin tone.
- Anti-inflammatory properties: Soothes irritation and redness.
- Natural and chemical-free: You control exactly what goes on your skin.
Ingredients for Your DIY Papaya Enzyme Mask
Below is a simple, effective recipe using fresh ingredients and natural actives. Quantities are given as percentages for precise formulation, ideal for small batch skincare making.
| Ingredient | Function | Percentage (%) | Weight (for 100g batch) |
|---|---|---|---|
| Fresh ripe papaya pulp | Source of papain enzyme | 60% | 60g |
| Organic Greek yoghurt | Probiotic, lactic acid exfoliant, moisturiser | 25% | 25g |
| Raw honey | Humectant, antibacterial, skin soothing | 10% | 10g |
| serum-scars/”>Vitamin C powder (ascorbic acid) | Brightening antioxidant | 2% | 2g |
| Fresh lemon juice | Natural astringent & mild exfoliant | 3% | 3g (~3 ml) |
Notes on Ingredients
- Fresh papaya: Use ripe papaya for optimal enzyme activity.
- Greek yoghurt: Adds gentle lactic acid exfoliation and creamy texture.
- Raw honey: Choose unprocessed honey for maximum skin benefits.
- Vitamin C powder: Use pure L-ascorbic acid powder; dissolve well.
- Lemon juice: Adds a natural brightening boost but be cautious if you have sensitive skin.
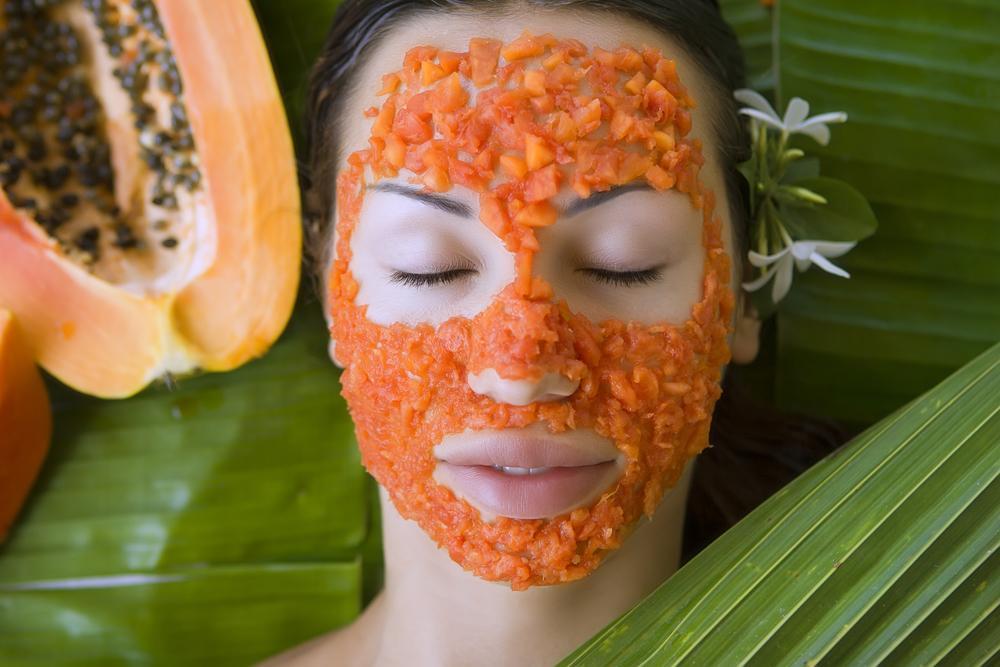
Step-by-Step Method to Create Your DIY Papaya Enzyme Mask
- Prepare the papaya pulp: Scoop out 60g of ripe papaya flesh and mash with a fork or blend briefly until smooth but not watery.
- Add Greek yoghurt: Stir in 25g of organic Greek yoghurt until fully combined.
- Mix in honey: Add 10g of raw honey and blend evenly.
- Dissolve vitamin C: Pre-dissolve 2g of vitamin C powder in 3g of fresh lemon juice to avoid grittiness.
- Combine all ingredients: Add the vitamin C-lemon juice mixture to the papaya blend and mix thoroughly.
- Optional: Adjust texture with a drop of aloe vera gel if the mask feels too runny, keeping total weight constant.
How to Use Your Papaya Enzyme Mask Safely
- Patch test: Always perform a patch test 24 hours before full application to check for sensitivity.
- Application: Apply a thin, even layer to cleansed face, avoiding eyes and lips.
- Leave on: Allow the mask to sit for 10 to 15 minutes. You may feel a mild tingling sensation, which is normal.
- Rinse: Use lukewarm water to gently remove the mask, massaging in circular motions for added exfoliation.
- Moisturise: Follow with your favourite hydrating serum or cream.
- Frequency: Use this mask 1-2 times per week for best results.
Storage and Shelf Life
Because this mask uses fresh ingredients, it has a short shelf life. Store your DIY papaya enzyme mask in an airtight container in the fridge and use within 3 days to ensure enzyme activity and prevent spoilage. Do not freeze, as this can break down the enzymes and texture.
Safety Precautions
- Avoid sensitive areas: Keep away from eyes and lips to prevent irritation.
- Sun sensitivity: The natural acids and vitamin C can increase photosensitivity. Use sunscreen after treatment and avoid direct sun exposure immediately after.
- Allergic reactions: If you experience redness, itching, or burning beyond mild tingling, rinse off immediately and discontinue use.
- Ingredient quality: Use fresh, high-quality ingredients to minimise risk of contamination.
FAQ About Your DIY Papaya Enzyme Mask
1. Can I use dried papaya powder instead of fresh papaya?
Yes, but fresh papaya contains active enzymes that dried powders may lack. If using powder, ensure it is specifically labelled as enzyme-active and adjust quantities accordingly, as potency varies.
2. How often can I use this papaya enzyme mask?
1-2 times per week is sufficient for gentle exfoliation and brightening. Overuse can lead to irritation or sensitivity.
3. Is this mask suitable for sensitive skin?
Generally, yes. Papaya enzyme is gentle, but the lemon juice and vitamin C may cause irritation. Always patch test first and reduce lemon juice if needed.
4. What skin types benefit most from this mask?
All skin types can benefit, especially those with dull, uneven, or congested skin. Sensitive and acne-prone skin may find it soothing and clarifying.
5. Can I store leftover mask after applying?
It’s best to prepare fresh batches due to the short shelf life and enzyme activity. Store any leftover mask in the fridge for no longer than 3 days.
Final Thoughts: Embrace the Glow with DIY Skincare
Creating your own DIY papaya enzyme mask is a rewarding way to bring natural, effective skincare into your routine. Not only do you control the ingredients and avoid harsh chemicals, but you also connect with the nourishing power of nature. Whether you’re a beginner or an experienced formulator, this mask is a simple, affordable treat for your skin that delivers real brightening benefits. So grab a ripe papaya, gather your ingredients, and start crafting your glow today—because radiant skin starts with the care you create yourself.
You May Also Like