Discover the Power of DIY Azelaic Acid Serum for Hyperpigmentation and Rosacea
What if you could tackle stubborn dark spots and calm rosacea flare-ups with a single, effective product made right in your own kitchen? Enter the DIY azelaic acid serum, a powerhouse skincare staple that’s gaining traction for its remarkable ability to even skin tone, reduce redness, and gently exfoliate without the harsh side effects of some treatments. If you’ve been searching for a natural yet scientifically backed solution that fits perfectly into your personalised skincare routine, this guide will show you how to create your own azelaic acid serum safely and effectively.
Why Choose Azelaic Acid for Hyperpigmentation and Rosacea?
Azelaic acid is a naturally occurring dicarboxylic acid found in grains like barley and wheat. It boasts anti-inflammatory, antibacterial, and antioxidant properties that make it ideal for treating both hyperpigmentation and rosacea. Unlike some acids that can cause irritation, azelaic acid is generally well tolerated, making it a favourite for sensitive skin types.
- For hyperpigmentation: It inhibits tyrosinase, the enzyme responsible for melanin production, effectively lightening dark spots and promoting a more even skin tone.
- For rosacea: Its anti-inflammatory and antimicrobial effects help reduce redness and prevent flare-ups by calming irritated skin.
Commercial azelaic acid products can be expensive or contain unwanted additives. Crafting your own DIY azelaic acid serum allows you to control the concentration and ingredients, tailoring it precisely to your skin’s needs.
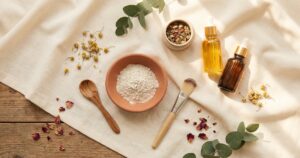
Essential Ingredients for Your DIY Azelaic Acid Serum
To make an effective and safe azelaic acid serum, you’ll need the right ingredients and careful preparation. Here is a simple, balanced formula designed for a 100g batch with a 10% azelaic acid concentration — a common strength recommended for both hyperpigmentation and rosacea:
| Ingredient | Purpose | Percentage (%) | Weight (g) |
|---|---|---|---|
| Azelaic Acid Powder | Active ingredient for pigmentation & inflammation | 10 | 10 |
| Propylene Glycol or Glycerin | Solubiliser and humectant | 15 | 15 |
| Aloe Vera Juice or Distilled Water | Hydrating solvent | 70 | 70 |
| Preservative (e.g. Leucidal Liquid or Geogard ECT) | Prevents microbial growth | 2 | 2 |
| Niacinamide (Optional) | Boosts brightening & anti-inflammatory effects | 3 | 3 |
Step-by-Step Guide: How to Make Your Own Azelaic Acid Serum
- Prepare your workspace: Clean and sanitise all utensils, containers, and your working surface to prevent contamination.
- Heat the solvent: Warm the aloe vera juice or distilled water to approximately 40°C to assist dissolution. Avoid overheating, as this can degrade ingredients.
- Dissolve azelaic acid: Slowly add the azelaic acid powder to the warmed solvent while stirring constantly. Azelaic acid is poorly soluble in water, so incorporating propylene glycol or glycerin helps to solubilise it effectively.
- Add humectants and actives: Stir in the propylene glycol or glycerin and optional niacinamide until fully dissolved and homogeneous.
- Cool and preserve: Let the mixture cool to below 40°C, then add your chosen preservative, mixing thoroughly.
- Transfer to container: Pour the serum into a sterilised amber glass dropper bottle or airless pump container to protect it from light and air.
- Label your product: Include the batch date and ingredients list for reference.
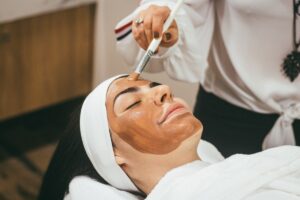
Important Safety Notes for Your DIY Azelaic Acid Serum
- Patch test first: Apply a small amount on your inner forearm or behind your ear and wait 24 hours to check for any adverse reactions.
- Concentration matters: 10% azelaic acid is generally effective and safe, but if you have sensitive skin, start with 5% and increase gradually as tolerated.
- Avoid eye contact: Azelaic acid can irritate mucous membranes.
- Sun protection: Azelaic acid can make your skin more sensitive to UV rays. Always apply sunscreen during the day.
- Use proper preservation: Since this serum contains water, a preservative is essential to prevent microbial contamination.
- Storage: Store your DIY azelaic acid serum in a cool, dark place. Refrigeration can extend shelf life.
Storage and Shelf-Life
Your DIY azelaic acid serum should last approximately 4 to 6 weeks when properly preserved and stored. Because azelaic acid solutions are relatively stable, refrigeration is optional but recommended to maintain potency and freshness. Always check for changes in smell, texture, or colour before use, and discard if you notice signs of spoilage.
Frequently Asked Questions (FAQ)
1. Can I use azelaic acid serum daily?
Yes, many people tolerate daily use of 10% azelaic acid serum, especially if introduced gradually. Start by applying every other day, then increase frequency as your skin builds tolerance.
2. Can I combine azelaic acid with other active ingredients?
Azelaic acid pairs well with ingredients like niacinamide and hyaluronic acid. However, avoid mixing it with exfoliating acids (AHAs/BHAs) or vitamin C at the same time to minimise irritation. Layer them at different times or alternate days.
3. Is DIY azelaic acid serum suitable for all skin types?
Generally, yes. Its anti-inflammatory and gentle exfoliating properties make it suitable for sensitive, acne-prone, and rosacea-affected skin. Always patch test to ensure compatibility.
4. How do I know if my azelaic acid serum is working?
Improvements in redness, texture, and pigmentation may take 4 to 8 weeks to become noticeable. Consistency and sun protection enhance results.
5. Can I increase azelaic acid concentration above 10% in my serum?
While higher concentrations are available in prescription products, exceeding 10% in a DIY serum increases the risk of irritation and is not recommended without professional guidance.
Final Thoughts: Embrace the Power of DIY Skincare with Azelaic Acid
Creating your own DIY azelaic acid serum is not only empowering but also a cost-effective way to address persistent skin concerns like hyperpigmentation and rosacea. By controlling the ingredients and concentration, you tailor a potent formula that aligns perfectly with your skin’s unique needs. This hands-on approach to skincare fosters deeper connection with your routine and opens the door to further exploration of active ingredients.
So why wait? Gather your ingredients, follow the steps carefully, and embark on a rewarding journey into DIY skincare. Your skin will thank you for the personalised care and thoughtful formulation.
You May Also Like