Unlock Radiant Skin: How to Make a DIY Green Tea Toner for Antioxidant Protection
Ever wondered if your skincare routine could do more than just cleanse and refresh? Imagine a simple, natural potion that not only tones your skin but also shields it from the daily onslaught of environmental stressors. Welcome to the world of DIY green tea toner, a powerhouse elixir brimming with antioxidants like EGCG to fight free radicals, reduce inflammation, and promote a glowing complexion. Whether you’re a beginner or seasoned in DIY skincare, this guide will walk you through making your own affordable, effective green tea toner at home.
Why Choose a DIY Green Tea Toner?
Green tea is more than just a calming beverage. Packed with polyphenols, especially epigallocatechin gallate (EGCG), it’s a potent antioxidant that helps protect skin from pollution, UV damage, and premature ageing. Commercial toners often contain alcohol or synthetic ingredients that can irritate sensitive skin. By crafting your own DIY green tea toner, you control every ingredient and avoid harsh chemicals, making it perfect for all skin types, including sensitive and acne-prone skin.
Key Benefits of Green Tea Toner
- Antioxidant Protection: Neutralises free radicals and reduces oxidative stress.
- Anti-Inflammatory: Soothes redness and calms irritated skin.
- Oil Control: Helps balance sebum production for clearer skin.
- Hydrating: Refreshes skin without stripping natural moisture.
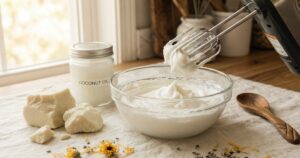
Ingredients for Your DIY Green Tea Toner
Precision is key when making skincare, especially if you’re creating products to sell or share. Here’s a simple, effective formula designed for antioxidant-rich, gentle toning:
| Ingredient | Function | Quantity (%) | Weight (grams for 100g batch) |
|---|---|---|---|
| Distilled Water | Solvent base | 75% | 75 g |
| Green Tea Extract (or brewed green tea concentrate) | Antioxidant, soothing | 15% | 15 g |
| Aloe Vera Juice | Hydrating, calming | 7% | 7 g |
| Vegetable Glycerin | Humectant, moisturiser | 2% | 2 g |
| Preservative (e.g., Geogard ECT or Leucidal Liquid) | Prevents microbial growth | 1% | 1 g |
Note: Green tea extract is preferred for higher potency and longer shelf life. If using brewed green tea, ensure it’s concentrated and freshly prepared.
Step-by-Step Method to Make Your DIY Green Tea Toner
- Prepare Your Work Area: Clean and sterilise all utensils, containers, and work surfaces with isopropyl alcohol or boiling water to prevent contamination.
- Brew Green Tea (if using brewed concentrate): Steep 2-3 green tea bags in 50ml of hot distilled water for 10 minutes. Allow to cool completely and strain.
- Combine Water and Extract: In a clean mixing bowl, add the distilled water and green tea extract (or cooled brewed concentrate). Stir gently.
- Add Aloe Vera Juice and Glycerin: Measure and incorporate aloe vera juice and vegetable glycerin into the mixture. Mix well until fully blended.
- Add Preservative: Add your chosen preservative according to the manufacturer’s instructions (usually at 1% of total batch weight). Stir thoroughly to ensure even distribution.
- Transfer to Container: Pour the toner into a sterile amber glass spray bottle or pump bottle to protect it from light and contamination.
- Label Your Toner: Include the date made and ingredients for easy reference.
Safety Notes and Storage Tips for DIY Green Tea Toner
- Preservative is essential to prevent bacteria and mould, especially because this toner contains water and botanical extracts.
- Patch Test first: Apply a small amount on your inner forearm to check for allergic reactions or irritation.
- Store in a cool, dark place: Ideally keep your toner in the fridge to extend shelf life and enhance the refreshing effect.
- Shelf life: With preservative, your toner should last 4-6 weeks. Without preservative, use immediately and refrigerate, but limit to 5-7 days.
- Use clean hands or a spray nozzle to avoid contaminating your toner.
FAQ: Your DIY Green Tea Toner Questions Answered
Can I use brewed green tea instead of green tea extract?
Yes, brewed green tea can be used but it is less concentrated and more prone to microbial growth. Always refrigerate and use within a week if you don’t add a preservative. For longer-lasting toner, green tea extract is recommended.
What preservative should I use in my DIY green tea toner?
Preservatives like Geogard ECT or Leucidal Liquid are excellent because they are broad-spectrum, natural, and skin-friendly. Use according to the manufacturer’s guidelines, typically 0.5–1% of the total formula.
Is this toner suitable for sensitive skin?
Yes, the calming properties of green tea and aloe vera make this toner very gentle. However, always patch test before full application, especially if you have very sensitive or reactive skin.
Can I add essential oils to my green tea toner?
You can add up to 0.5% skin-safe essential oils like lavender or tea tree for added benefits, but these may irritate sensitive skin. Introduce them cautiously and always patch test.
How often should I use this DIY green tea toner?
Use the toner twice daily after cleansing, morning and night. It helps balance skin pH, hydrate, and prepare your skin for moisturisers or serums.
Final Thoughts: Embrace the Power of DIY Skincare
Crafting your own DIY green tea toner is a rewarding way to nourish your skin with natural antioxidants that protect and soothe. Beyond the satisfaction of making your own skincare, you gain full control over what goes on your skin—no unnecessary additives or harsh chemicals. Whether you’re looking to boost your daily routine or start a small skincare line, this simple toner formula is a fantastic starting point. So why not embrace the art of DIY skincare today and discover how natural ingredients like green tea can transform your skin and confidence?
You May Also Like