Unlock Radiant Skin Overnight: How to Make a DIY Sleeping Mask
Ever wonder why K-beauty enthusiasts swear by their overnight treatments? The secret lies in the magic of a DIY sleeping mask—a powerful, hydrating, and restorative layer you apply before bed to wake up with glowing, nourished skin. But not all sleeping masks are created equal, and buying them off the shelf can be pricey or loaded with unnecessary additives. What if you could craft your own customised formula at home, tailored to your skin’s unique needs? In this guide, you’ll learn exactly how to make a simple, effective DIY sleeping mask that locks in moisture and supports skin repair while you sleep.
Why Choose a DIY Sleeping Mask?
Sleeping masks are designed to be the final step in your nighttime skincare routine. They act as an occlusive barrier, sealing in hydration and active ingredients to dramatically improve skin texture and moisture levels. By making your own, you can:
- Control ingredient quality and potency
- Tailor the formula for sensitive, dry, oily, or combination skin
- Avoid preservatives and fragrances that can irritate skin
- Save money compared to high-end products
- Embrace sustainable, low-waste skincare practices
Key Ingredients for a DIY Sleeping Mask
Effective sleeping masks combine occlusive agents with humectants and targeted actives. Here’s a breakdown of what each ingredient type does:
- Occlusives: Create a breathable barrier that locks moisture in, such as plant butters and oils (shea butter, jojoba oil)
- Humectants: Attract water to your skin to boost hydration (glycerin, hyaluronic acid)
- Emollients: Smooth and soften skin (squalane, caprylic triglyceride)
- Actives: Support skin repair and renewal (niacinamide, panthenol, peptides)
- Preservatives: Essential for safety, especially if using water-based ingredients (broad-spectrum preservatives like Geogard ECT)
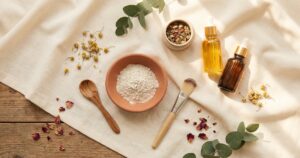
DIY Sleeping Mask Ingredients List
| Ingredient | Function | Percentage (%) | Quantity (for 100g batch) |
|---|---|---|---|
| Shea Butter | Occlusive, moisturising | 15% | 15 g |
| Jojoba Oil | Emollient, barrier repair | 10% | 10 g |
| Vegetable Glycerin | Humectant | 8% | 8 g |
| Distilled Water | Solvent, hydration | 45% | 45 g |
| Hyaluronic Acid (1% solution) | Hydration boost | 5% | 5 g |
| Niacinamide | Skin brightening, barrier support | 5% | 5 g |
| Panthenol (Pro-serum-scars/”>Vitamin B5) | Soothing, moisturising | 3% | 3 g |
| Emulsifying Wax (e.g., Polawax) | Blend oils and water | 8% | 8 g |
| Broad-spectrum Preservative (e.g., Geogard ECT) | Preservation | 1% | 1 g |
Step-by-Step Method to Make Your DIY Sleeping Mask
- Prepare your workspace: Sanitize all equipment, bowls, and utensils with isopropyl alcohol or boiling water to avoid contamination.
- Heat the oil phase: In a heat-safe bowl, combine the shea butter, jojoba oil, and emulsifying wax. Gently heat this mixture using a double boiler until fully melted (around 70°C).
- Heat the water phase: Warm the distilled water and glycerin in a separate container to approximately the same temperature.
- Combine phases: Slowly pour the water phase into the oil phase while continuously stirring with a hand whisk or mini mixer. Continue mixing until the mixture thickens and cools down to about 40°C.
- Add actives and preservative: Stir in the hyaluronic acid solution, niacinamide, panthenol, and preservative. Ensure each ingredient is fully incorporated.
- Cool and jar: Allow the mixture to cool completely before transferring it to a clean, airtight jar. Label with date and batch details.
- Final check: Check the texture and consistency; it should be creamy, smooth, and spreadable without being greasy.
Safety Precautions and Storage Tips
- Preservation: Always include a broad-spectrum preservative when your formula contains water to prevent bacterial growth.
- Patch test: Before applying liberally, do a patch test on a small skin area to check for sensitivity or allergic reaction.
- Cleanliness: Use clean hands or a spatula to apply your DIY sleeping mask to avoid contamination.
- Storage: Keep your sleeping mask in a cool, dry place away from direct sunlight. Refrigeration can prolong shelf life and offer a refreshing application.
- Shelf life: With proper preservatives and hygiene, your DIY sleeping mask should last 6 to 8 weeks. Discard if you notice changes in smell, texture, or colour.
FAQ: Your DIY Sleeping Mask Questions Answered
1. Can I use essential oils in my DIY sleeping mask?
Essential oils can be irritating, especially overnight. If you want to include them, use only skin-safe oils at very low concentrations (typically below 0.5%) and do a patch test. Avoid photosensitive oils if you plan to use the mask during the day.
2. How often should I use a sleeping mask?
Use your DIY sleeping mask 2–3 times per week as an intensive treatment. If your skin tolerates it well, you can increase frequency, but daily use may be too heavy for oily or acne-prone skin types.
3. Can I customise this recipe for oily or acne-prone skin?
Absolutely! Swap heavier oils like jojoba for lighter options such as squalane or grapeseed oil. Reduce shea butter to 10% or less. Also, consider adding soothing actives like green tea extract or tea tree oil in low amounts.
4. What’s the difference between a sleeping mask and a night cream?
Night creams are usually lighter moisturisers designed for overnight use but absorb fully without an occlusive layer. Sleeping masks create a protective barrier on the skin’s surface to trap moisture and actives for longer-lasting effects.
5. Can I skip the preservative if I only make a small batch?
If your formula contains water, a preservative is essential to prevent harmful microbial growth. For waterless recipes, preservatives may not be necessary, but for this sleeping mask, which contains water, never skip the preservative.
Final Thoughts: Embrace the Power of DIY Skincare
Creating your own DIY sleeping mask is not only a rewarding way to nourish your skin but also a step towards mindful, customised skincare that truly suits your needs. By carefully selecting ingredients and following safe formulation practices, you’ll wake up every morning to skin that feels plump, hydrated, and revitalised. So why wait? Dive into the world of DIY skincare, experiment with your own recipes, and discover the joy of glowing skin made by your own hands.
You May Also Like