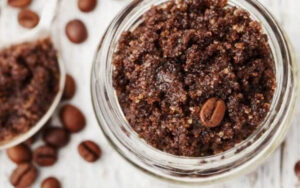
Imagine the rich, deep aroma of freshly brewed coffee filling your kitchen on a slow Saturday morning. Now, imagine that same invigorating scent and skin-transforming power as part of your self-care routine. The DIY coffee body scrub has become a viral sensation for a good reason: it is one of the most effective, natural, and budget-friendly ways to achieve incredibly smooth skin. Whether you are looking to prep your skin for a fake tan, reduce the appearance of dry patches, or simply enjoy a spa-like experience at home, this homemade remedy delivers professional results without the luxury price tag.
Coffee is not just a morning pick-me-up for your brain; it is a powerhouse ingredient for your skin. When used as a physical exfoliant, coffee grounds work to slough away dead skin cells that can make your complexion look dull and feel rough. Beyond the mechanical exfoliation, the caffeine found in coffee is a natural vasoconstrictor, which can temporarily tighten and plump the skin. This unique combination of physical and chemical benefits makes a DIY coffee body scrub the ultimate tool for anyone seeking a natural glow and improved skin texture.
Why Coffee is a Skincare Superfood
To understand why a DIY coffee body scrub is so effective, we must look at the science behind the bean. Coffee grounds possess a unique structure that makes them superior to many synthetic exfoliants. Unlike plastic microbeads, which are harmful to the environment, or large salt crystals, which can sometimes have sharp edges, coffee grounds provide a firm but manageable level of abrasion. This allows you to remove the “stratum corneum”—the outermost layer of dead skin—without causing micro-tears in the delicate lipid barrier of your skin.
The star of the show, however, is caffeine. When applied topically through a scrub, caffeine stimulates blood flow and enhances circulation. This increased blood flow brings fresh oxygen and nutrients to the skin’s surface, resulting in a healthier, more radiant appearance. Many enthusiasts swear by coffee scrubs for their ability to temporarily reduce the appearance of cellulite. While no topical treatment can permanently remove cellulite, the combination of the massaging action and the dehydrating effect of caffeine can lead to a smoother, firmer look that lasts for several hours. This makes it a perfect pre-event ritual for when you want your skin to look its absolute best.
Furthermore, coffee is packed with antioxidants, including phenols and flavonoids. These compounds help to neutralise free radicals caused by environmental stressors like UV rays and pollution. By incorporating these antioxidants into your DIY coffee body scrub, you are not only cleaning your skin but also providing it with a protective layer of defense against premature ageing. It is a holistic approach to body care that treats the skin from multiple angles simultaneously.
Fresh vs Used Coffee Grounds: Which is Better?
One of the most common questions for DIY skincare beginners is whether to use fresh grounds straight from the bag or recycled grounds from their morning brew. Both options have their merits, and the choice often depends on your skin’s sensitivity and your commitment to sustainability. Fresh coffee grounds are typically coarser and have a much higher caffeine content, as none of the active compounds have been extracted by hot water yet. If you are looking for maximum “oomph” in terms of skin tightening and a very strong aroma, fresh grounds are the way to go.
On the other hand, using recycled grounds is a fantastic way to practice zero-waste skincare. Used grounds are slightly softer because they have been “cooked” by hot water, making them a gentler option for those with sensitive skin. However, there is a catch: used grounds contain moisture. If you plan to use them in a DIY coffee body scrub that you intend to store for more than a day, you must dry them out completely first. You can do this by spreading them on a baking tray and leaving them in a low-temperature oven for about 20 minutes. If you skip this step, the moisture in the grounds will inevitably lead to mould growth in your jar, which is a safety hazard you definitely want to avoid.
Regardless of which type you choose, the grind size matters. For a body scrub, a medium-to-coarse grind is ideal. It provides enough “grit” to be effective on tougher areas like the elbows, knees, and heels. If you find the texture too intense, you can always blend your grounds slightly to achieve a finer consistency, though most formulators find that standard drip-filter grounds are the “Goldilocks” size for body exfoliation.
The Ultimate DIY Coffee Body Scrub Recipe
Creating your own DIY coffee body scrub is a straightforward process that requires only a few high-quality ingredients. This recipe is designed to be balanced: it provides intense exfoliation, deep moisturisation, and a heavenly scent that lingers on the skin. We have selected ingredients that are easily accessible but offer professional-grade benefits. The following measurements are approximate and can be adjusted based on your personal preference for “grit” versus “slip.”
| Ingredient | Amount | Approx. % | Purpose |
|---|---|---|---|
| Ground Coffee | 1 Cup | 50% | Exfoliant & Caffeine Source |
| Brown Sugar | 1/2 Cup | 25% | Gentle Secondary Exfoliant |
| Melted Coconut Oil | 1/2 Cup | 20% | Moisturiser & Binder |
| Sweet Almond Oil | 1 tbsp | 3% | Vitamin E & Skin Softener |
| Vanilla Extract | 1 tsp | 2% | Natural Fragrance |
Step-by-Step Instructions
- Prepare Your Workspace: Ensure all your mixing bowls and storage jars are clean and completely dry. Any trace of water can introduce bacteria into your preservative-free scrub.
- Combine Dry Ingredients: In a medium-sized bowl, whisk together the coffee grounds and the brown sugar. Ensure there are no large clumps of sugar, as you want a consistent texture throughout the DIY coffee body scrub.
- Prepare the Oils: If your coconut oil is solid, gently melt it in a microwave or over a double boiler until it is liquid but not hot. Stir in the sweet almond oil and the vanilla extract.
- The Big Mix: Slowly pour the oil mixture over the dry ingredients. Use a spoon or a spatula to fold the mixture together until every grain of coffee and sugar is coated in oil. The consistency should resemble wet sand: it should hold together when squeezed but still be easy to scoop.
- Jar and Store: Transfer your finished scrub into an airtight glass jar. Press it down firmly to remove any air pockets, which helps with preservation.
Variations: Wet vs Dry Scrubs
The beauty of a DIY coffee body scrub is its versatility. You can customise the consistency to suit your personal preference. A “dry” scrub is one that has a high concentration of coffee and sugar with just enough oil to hold it together. These are fantastic for maximum exfoliation, but they can be a bit messy to apply as the grounds tend to fall off the skin. A “wet” scrub, on the other hand, contains more oil and perhaps a natural emulsifier like beeswax or cetyl alcohol. These are much more moisturising and have a luxurious, creamy feel that stays on the skin better during application. For beginners, a balanced recipe like the one provided above is the perfect starting point.
How to Use Your DIY Coffee Body Scrub for Best Results
To get the most out of your DIY coffee body scrub, timing and technique are everything. The best time to exfoliate is during a warm shower or bath when your skin has had a few minutes to soften. The steam helps to open up your pores, making it easier for the scrub to remove dead skin cells and for the oils to penetrate deeply. Begin by rinsing your body with warm water to ensure your skin is damp but not soaking wet.
Take a small handful of the scrub and apply it in gentle, circular motions, starting from your feet and working your way up toward your heart. This upward motion is particularly effective for stimulating lymphatic drainage and improving circulation. Focus on areas that are prone to dryness or where you would like to see a firmer appearance, such as the thighs, buttocks, and upper arms. For the best results, leave the scrub on your skin for three to five minutes before rinsing. This gives the caffeine and antioxidants enough time to be absorbed and allows the coconut oil to deeply moisturise your skin.
When you are ready to rinse, use warm water and avoid using soap or body wash immediately after. The goal is to leave a thin, protective layer of oil on your skin. Once you step out of the shower, gently pat your skin dry with a towel instead of rubbing it. You will notice that your skin feels incredibly soft and has a healthy, natural glow that lasts all day. For those who enjoy a more intense experience, you can also try a dry-brushing technique before your shower, followed by your DIY coffee body scrub for double the benefits.
Frequency and Skin Safety
While it can be tempting to use your DIY coffee body scrub every day because of how amazing it makes your skin feel, moderation is key. Over-exfoliating can lead to skin irritation, redness, and a compromised moisture barrier. For most skin types, using the scrub two to three times per week is the “sweet spot” for maintaining smooth, healthy skin. If you have particularly sensitive skin, you might want to start with once a week and see how your body responds.
It is also important to remember that this is a body scrub, not a face scrub. The skin on your face is much thinner and more delicate than the skin on your legs or arms. The coarse texture of coffee grounds can be too abrasive for facial skin and may cause micro-tears. If you are looking for a facial exfoliant, consider using a much finer grind of coffee or a different ingredient altogether, such as colloidal oatmeal. Always perform a patch test on a small area of your skin before applying the scrub to your entire body to ensure you do not have any adverse reactions to the ingredients.
Pro Tips for a Mess-Free Experience
One of the biggest hurdles for people trying a DIY coffee body scrub for the first time is the cleanup. Coffee grounds do not dissolve in water, which means they can end up all over your shower floor and potentially clog your drains. To avoid a plumbing disaster, we recommend using a fine mesh drain strainer to catch the grounds as you rinse. Once you are finished, you can simply empty the strainer into your compost bin or rubbish bin. Another tip is to rinse your shower with plenty of hot water immediately after use to help flush any remaining oils and grounds through the pipes.
To minimize the mess during application, try to apply the scrub while standing in the middle of the shower or bath. You can also turn off the water while you are scrubbing to prevent the product from being washed away before it has a chance to work. If you find that the oils make your shower floor slippery, be sure to clean the surface with a degreasing soap or a simple vinegar-and-water solution after you are done to ensure safety for the next person using the bathroom. With these simple precautions, you can enjoy all the benefits of a DIY coffee body scrub without the headache of a messy cleanup.
Shelf Life and Storage
Because this DIY coffee body scrub does not contain any synthetic preservatives, its shelf life is shorter than store-bought alternatives. The primary enemy of any homemade skincare product is water. If water gets into your jar, it creates the perfect environment for bacteria and mould to grow. To prevent this, always use a clean, dry spoon to scoop out the product rather than reaching in with wet hands. Storing your scrub in a cool, dry place away from direct sunlight will also help to preserve the integrity of the oils.
When stored correctly in an airtight glass jar, your DIY coffee body scrub should last for about two months. If you notice any change in the scent, colour, or texture of the scrub, it is best to discard it and make a fresh batch. One of the joys of DIY skincare is that you can make small batches frequently, ensuring that your products are always fresh and potent. If you want to extend the shelf life slightly, you can add a few drops of Vitamin E oil, which acts as a natural antioxidant to prevent the oils from going rancid, though it is not a broad-spectrum preservative.
By making your own DIY coffee body scrub, you are taking control of what goes onto your skin. You are avoiding unnecessary chemicals, reducing plastic waste, and treating yourself to a high-quality product that actually works. It is a simple, effective, and deeply satisfying way to enhance your natural beauty routine. Whether you are a beginner or an experienced formulator, this coffee scrub is sure to become a staple in your bathroom cabinet. For more inspiration on natural skincare, you might want to explore our guides on other natural exfoliants or learn how to pair your scrub with a nourishing DIY body butter for the ultimate skin-smoothing duo.
In the world of natural beauty, sometimes the simplest ingredients are the most powerful. The humble coffee bean, when combined with nourishing oils and a bit of DIY spirit, transforms into a luxurious treatment that rivals the best spa products. Your journey to smoother, more radiant skin starts right in your kitchen. So, the next time you finish your morning cup of coffee, don’t throw away those grounds: turn them into your new favourite skincare secret.
You May Also Like